Deep Learning Server
On this page, I will detail the process of building a high-performance compute server node with four V100 GPUs for less than the cost of a single Nvidia RTX 4090, but with around triple the GPU memory and compute for training models (assuming 16/32 bit mixed precision training). The server will be shown to be very effective for other tasks outside the realm of machine learning and particularly excels at those requiring high numerical precision, as this machine has an impressive twenty-six times the the 64-bit FLOPs of a 4090.
Background
When one thinks of state-of-the-art deep learning models, one might imagine enormous data centers with thousands of GPUs training models with billions or trillions of parameters. While large computing clusters are indeed necessary for training the largest foundational models, they are not at all necessary to do interesting work in the field. For the past couple of years, I have been using the following rig for experimentation and model development (as well as three body simulation and polynomial root fractal generation and other assorted projects presented on my blog):
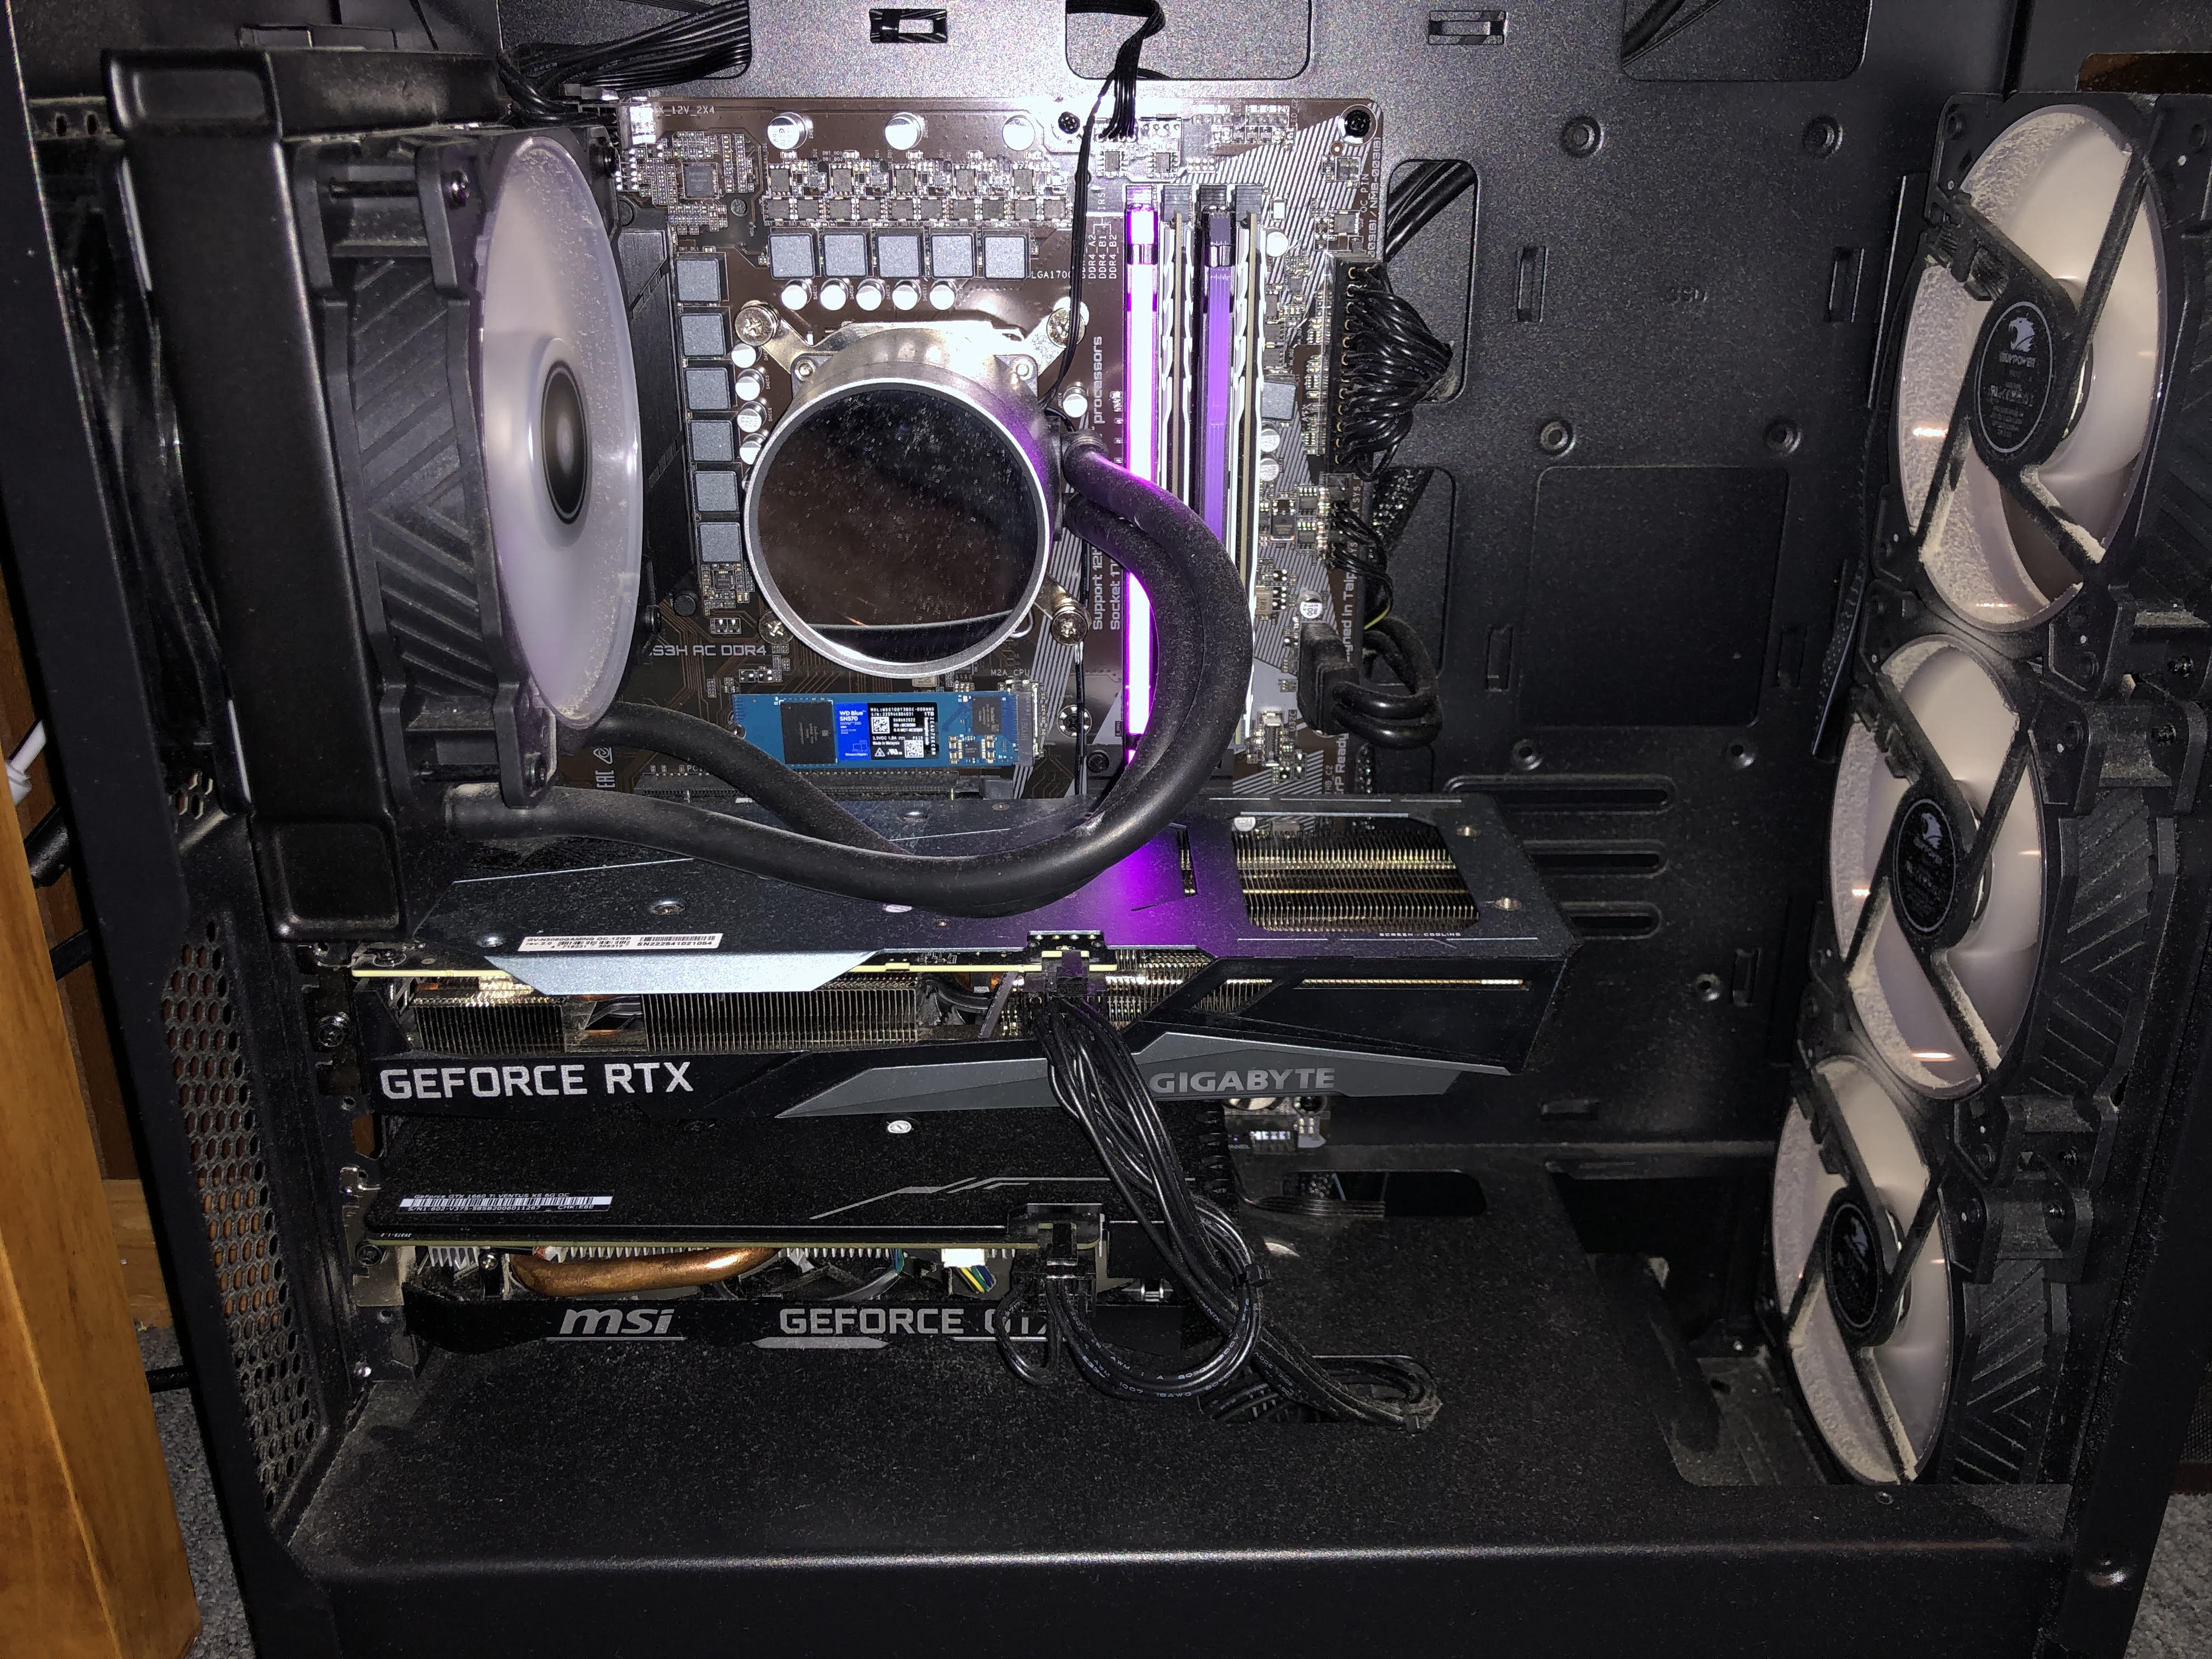
which consists of i7-12700F with 48GB RAM, an RTX 3060 with 12 GB vRAM and (more recently added) a GTX 1060 with 6GB vRAM on a Gigabyte B660m motherboard. This machine is more than capable for smaller experiments, and I have used it for the majority of my deep learning interpretability work.
But this system is certainly not ideal for training larger models or more extensive experimentation of other kinds. This is because the RTX 3060 low memory bandwidth (360 GBps) and CUDA core count (3584) relative to industrial hardware such that it is not particularly fast at training the models that it can fit in the 12 GB vRAM, even accounting for the FP16 support and asynchronous memory copy features that are present in Nvidia’s Ampere architecture. The 1060 was really only added for small-scale experiment work and software development purposes, as it is significantly slower (around two thirds the speed to be precise) than the 3060 and therefore would slow down training significantly were it to be used in parallel. This is a notable difference from other applications such as crypto mining, where the cluster runs at a sum speed of all individual GPUs. For deep learning the cluster will typically increase in speed with more parallelization, but will also be bottlenecked by slower GPUs if there is a large enough difference in their compute (especially for training). I typically perform training runs of no more than a few days, on models that are under 1 billion parameters (for foundational models) due to these limitations. To test methods and ideas that appear promising on this relatively modest amount of compute, I wanted to try upgrading.
The most straightforward way to make a significant upgrade to this rig in terms of GPU memory and compute (with some semblance of affordability) would be to add some used RTX 3090s and use PCIE extenders and a beefier power source or two. I came very close to choosing this route, but decided against it for a number of reasons: firstly because the B660 mobo has 5 PCIE slots but four of those are 1x PCIE 3.0, meaning 1 GBps data transfer for all GPUs except one. This is not really a problem for inference, but will slow down the gradient synchronization step for very large models during distributed training: for these two GPUs with a relatively small model (30m parameters), distributed data parallel training proceeds nearly four times as slowly as the same training algorithm with no all-gather operation communicating gradients. This means that a new motherboard would be necessary to avoid a severe bottleneck in distributed training for 3090s. Secondly, 3090s run quite hot (peaking up to 500 watts per gpu) and my PC resides in a small room, and thirdly because mixed precision training (where weights are stored in FP16 and gradients and norms in FP32) is not optimal on these GPUs due to their lack of full FP16 acceleration.
When deciding on the right GPU depends on many factors (inference or training workloads? large transformers or smaller cNNs?), a good resource to check when deciding on a GPU for deep learning is on Tim Dettmer’s blog. A very handy plot of the theoretical mixed precision training compute for each type of modern GPU is presented, but with some more research I noticed something curious: by far the best-value GPU by current market price (ie on ebay) is the 16 GB V100 SXM2. This is mostly because the SXM2 socket is relatively rare, but we will find a good system for this hardware without too much problem.
Because of this I decided to go with the V100, which is somewhat similar to the 3090 with nearly identical memory bandwidth (900.1 vs 936 GB/s), albeit double the Tensor core count with half the CUDA cores. The main functional difference is that the V100 is a data center card rather than a consumer one and is more suitable for extended workloads, and does not suffer from the memory overheating problems the 3090 is known for. It does have an older architecture (Volta) than the 3090 (Ampere) and therefore cannot take advantage of a number of improvements in Ampere such as asynchronous memory copy, but it has other advantages (full FP16 performance and more memory in the 32 GB V100). Using the SXM2 socket happily allows for much faster data transfer between GPUs than the more expensive PCI-e version, so it is a no-brainer for training.
Motivation
A similar general principle for procuring parts is found here that also was observed for high voltage engineering projects: obsolete (by industry standards) industrial equipment is often the cheapest way of accomplishing engineering tasks provided that one has the know-how to work with the equipment out of its intended use niche. On this page I will show you how to do exactly that in the context of a deep learning server.
Most deep learning servers with decent GPUs cost many thousands of dollars to buy used, much less new. The main exceptions to this are the Gigabyte T181-G20 and T180-G20, and this is because these servers are built to fit in and be powered by Open Compute Project 1OU racks. These racks are extremely rare and expensive, making even new T181s and T180s relatively inexpensive. Happily, however, these servers run perfectly well outside the OCP rack if supplied with external power from a sufficiently powerful source (12V with at least 80 amps to each of three power sockets). How this may be done will be described later.
The model I chose is a Gigabyte T180-G20, which is very similar to the T181-G20 except that it supports Intel Xeon E5 2600 v3 and v4 generation CPUs, whereas the T-181 supports Intel Xeon Scalable CPUs (which are effectively the next generation of Intel server CPU after the v4 E5s) and has more memory DIMMS (24 versus 16). For more information on the difference between these servers as well as the other OCP rack entrant from Gigabyte, see this documentation. If you were to expect your workloads to utilize a substantial amount of CPU compute, the T181-G20 would probably be worth looking at as the top-of-the-line 2600 series (the 2699) v4 Xeon is similar in workload performance to today’s i5 processor, whereas the top-of-the-line Xeon scalable gen 2 CPU (Platinum 8280, excluding the 400W TDP 9282) is more similar to today’s i7. That said, there are two processors per server and I have found that a pair of 2680 v4 Xeons (a mid-range Broadwell with about 2/3s the capability of the 2699) to be more than sufficient for most purposes. Memory and CPU->GPU transfers are also somewhat slower for the T180 as it has PCI-e Gen3 rather than the Gen4 in the T181.
After a half years use, it seems accurate to say that for the vast majority of tasks I have given the server the older CPUs have not been at all noticeable. For the few applicable CPU tasks that do benefit from faster hardware (multinomial sampling for example), I am considering swapping in a pair of e5 2699s in the future. If I were getting another server I would seriously consider the T181-G20, but would be inclined to prefer the T180-G20 once again. Between the costlier server, CPUs, and ram for the T181 compared to the T180, you would be able to pick up the V100 GPUs for free with the difference.
Because the T180-G20 supports older CPUs and less maximum memory than the T181s, they are a good deal cheaper and can be had for under a thousand dollars new. Not bad for a machine that supports up to 750 TFLOPs for FMA (fused multiply-add) matrix operations with up to six V100 GPUs (four sxm2 and two PCI-e), 192 GB vRAM with the same configuration, and 1.024 TB DDR4 RAM. In my initial configuration only the four SXM2 sockets are occupied, each with 16GB V100s to total 500 TFLOPs for tensor multiply-add operations with 64GB vRAM. These SXM2 sockets are interconnected via 300 GBps NVlink, making these four GPUs behave for all purposes as one large GPU performance-wise. I chose the 16GB rather than the 32GB V100 as they are nearly a factor of 10 cheaper at present, although the price of the 32gb versions is falling quickly. If you are interested in this GPU, I suggest reading the Volta architecture paper from nvidia for more information on the machine’s capabilities.
Hardware Installation
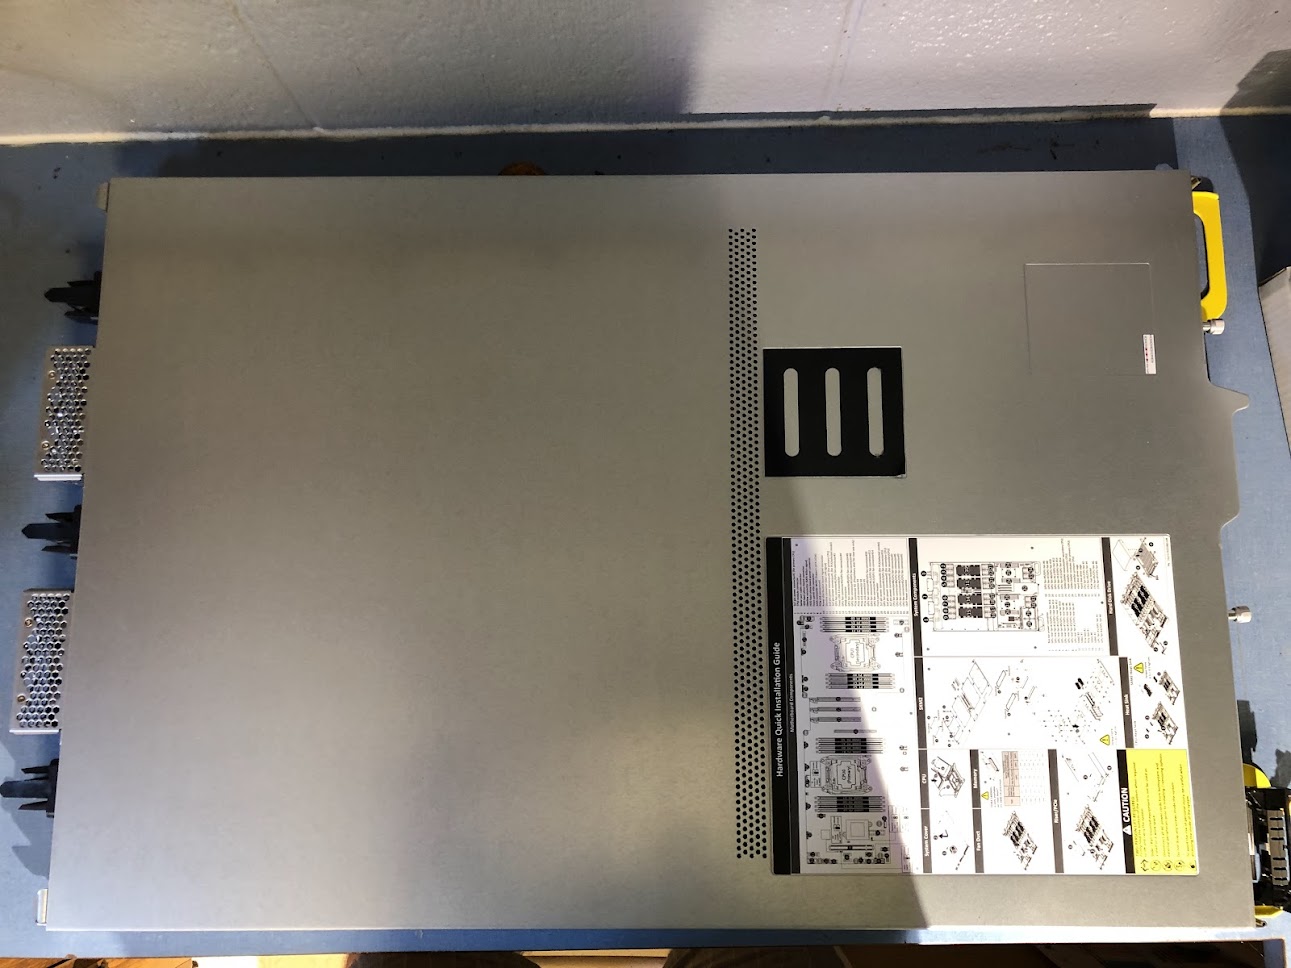
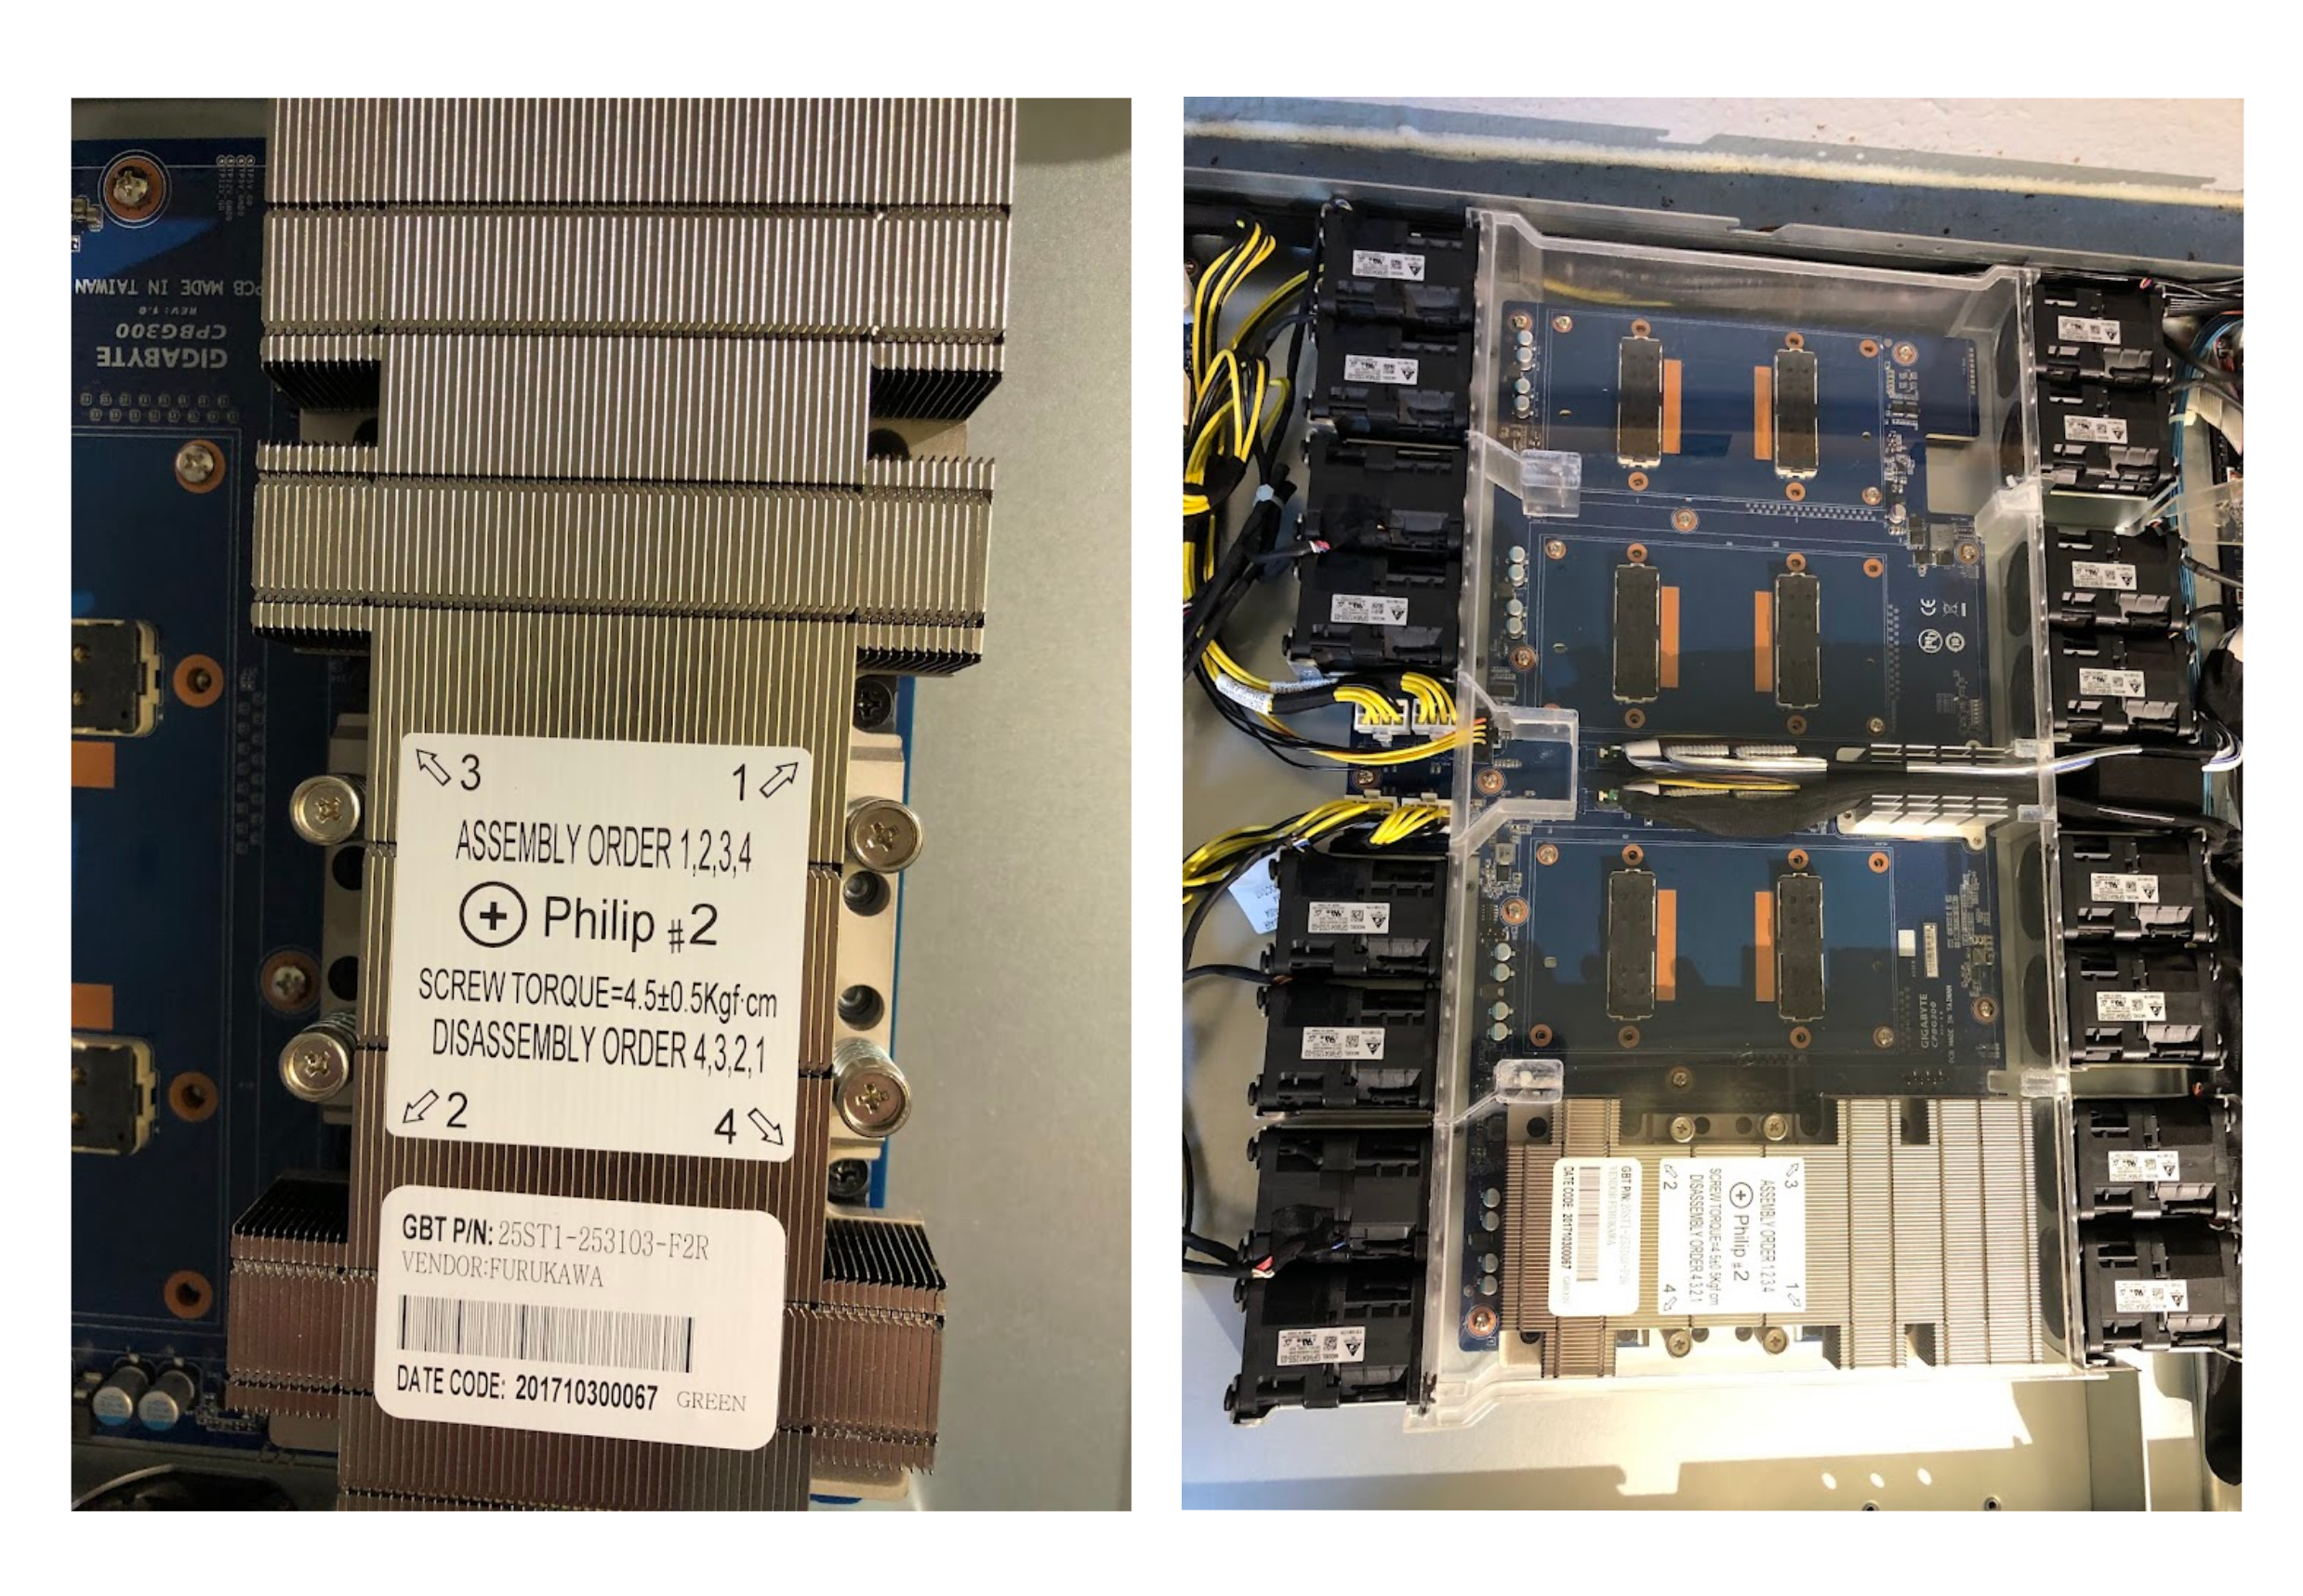
The T180-G20 comes with heatsinks for the GPUs (four) and CPUs (two). These heatsinks contain all the screws necessary pre-installed as well as thermal paste pre-applied, which is a very nice touch but is probably standard in the high performance compute industry. After removing the heatsinks, we find the server itself. In the following picture, the server is oriented where the power sockets are on the left and the I/O ports (and air inlets) are to the right. Note the hardware installation instructions happily present on the top of the case, and the opened HDD/SSD drive tray in the bottom right. The server even comes with those little storage drive screws which fixes the drive in place as the tray is inserted.
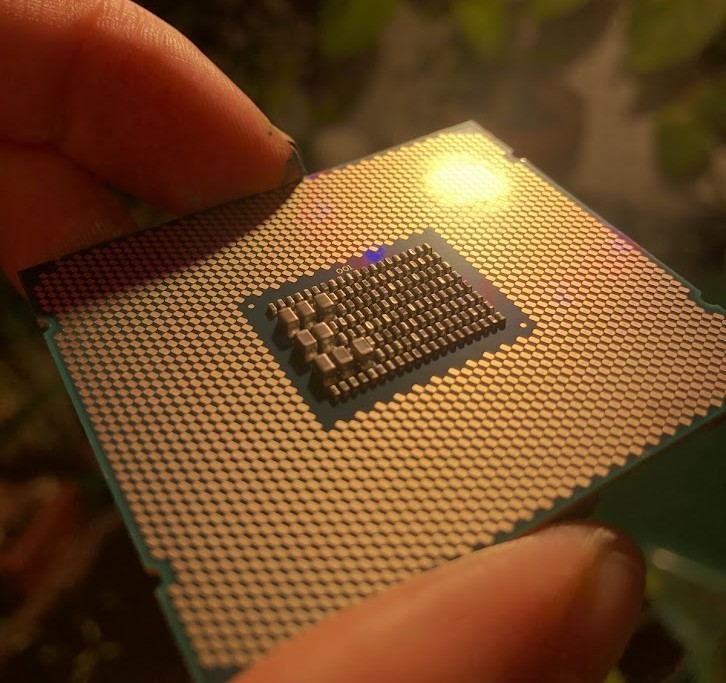
This server takes two CPUs which are interconnected and act for most purposes as a single unit, although it can run with only one. I thought that the Intel Xeon E5 2680 V4 would be a good balance between TDP (120 Watts each) and power (3.3 GHz turbo, with 28 threads, 40 PCI-e lanes, and 35 MB caches each). It is remarkable that a CPU of these attributes can be bought for under 20 dollars: to buy a consumer CPU with anywhere near the thread count or PCI-e lanes one would have to pay perhaps a hundred times that amount. This CPU has far more pins than the i7 12700K, and the lid is somewhat reminiscent of an AMD Ryzen. It tends to make removing thermal paste messy, as you can see:
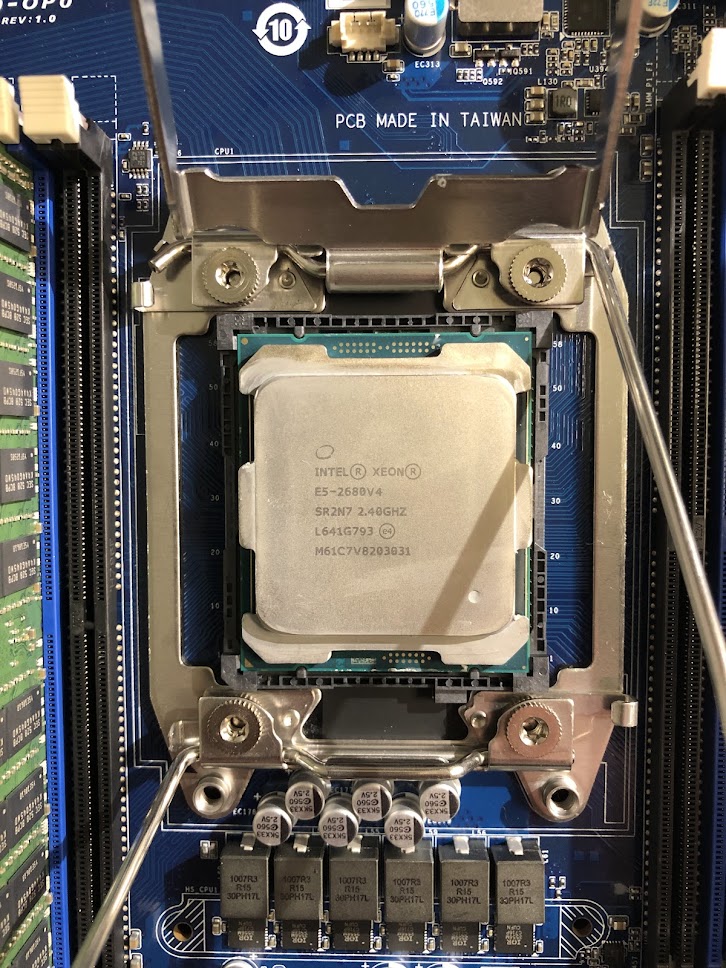
and here it is ready to be clipped in:
In terms of core count two CPUs are extremely overkill for most of the types of workloads I am expecting to run on this machine, that is, CUDA kernals for deep learning and dynamical systems. As we will see later, only one CPU is necessary for excellent performance (and really only a quarter of the cores of one CPU are required). A more powerful CPU does come in handy when one is attempting to perform linear algebraic operations outside the set of matrix multiply, add, convolve, etc: for example, finding the singular value decomposition of a matrix is typically a CPU-intensive process, and there it helps to have all the threads you can get. I will be performing this kind of operation non-infrequently, hence the more powerful CPUs. In terms of functional performance, the 2x Xeon 2680s are about as fast for tokenization as my (much newer) i7-12700K but together support nearly 10x the memory and PCI-e lanes. The i7 does have better performance than a single Xeon for both single- and multi-threaded jobs, but as there are two Xeons the server’s speed on CPU bound tasks is fairly similar for most tasks.
The CPU heatsinks are interesting: only half the base plate contains fins, a flat heatpipe covers the base, and the rest of the heatsink is apparently a copper alloy. In the following image you can also see one memory stick installed: this is a 16GB RDIMM RAM module for testing (more were added later). As with most servers, only RDIMM or LRDIMM modules may be used.
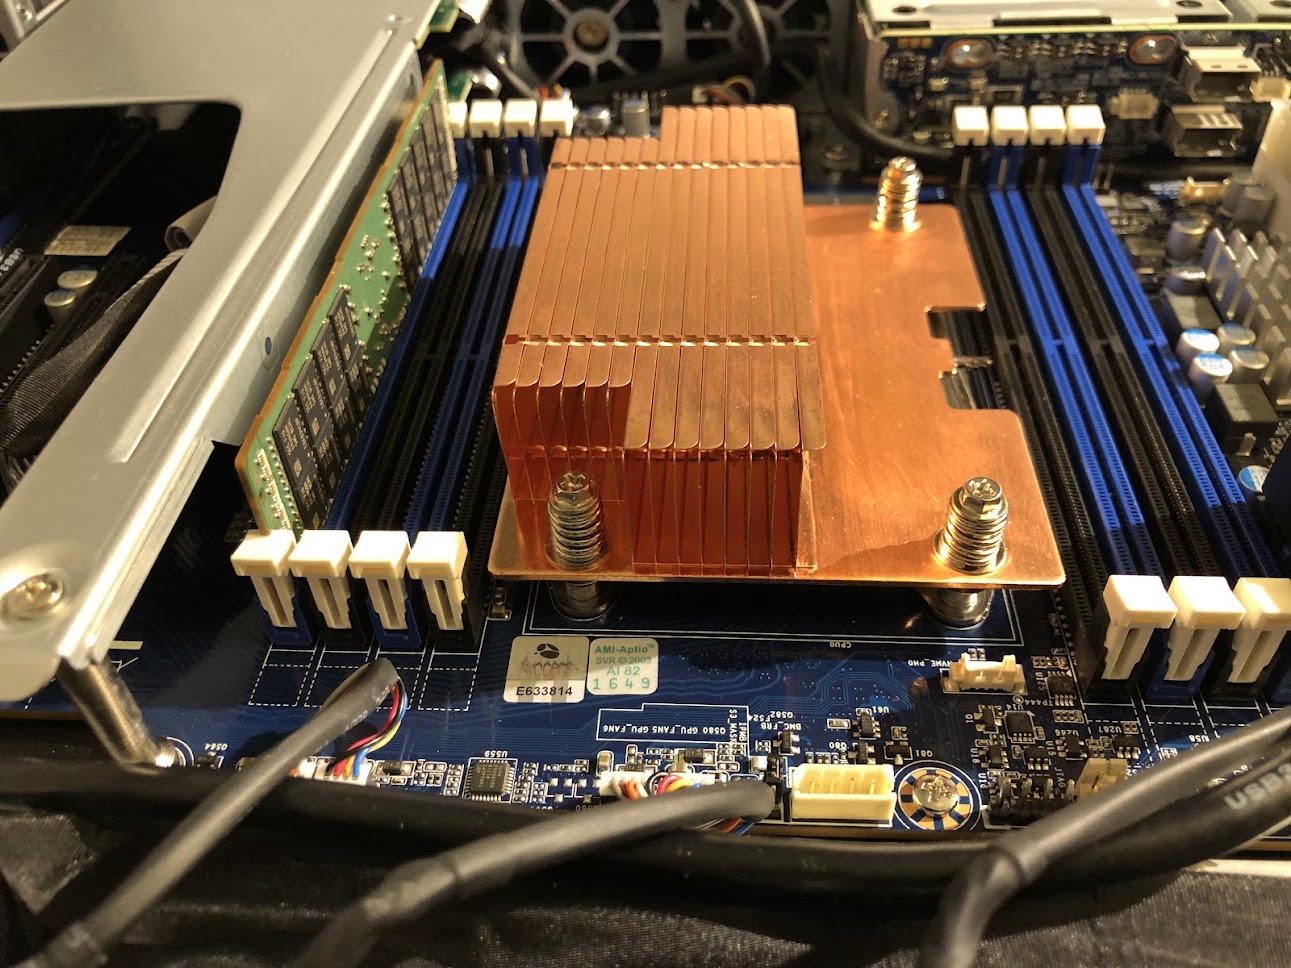
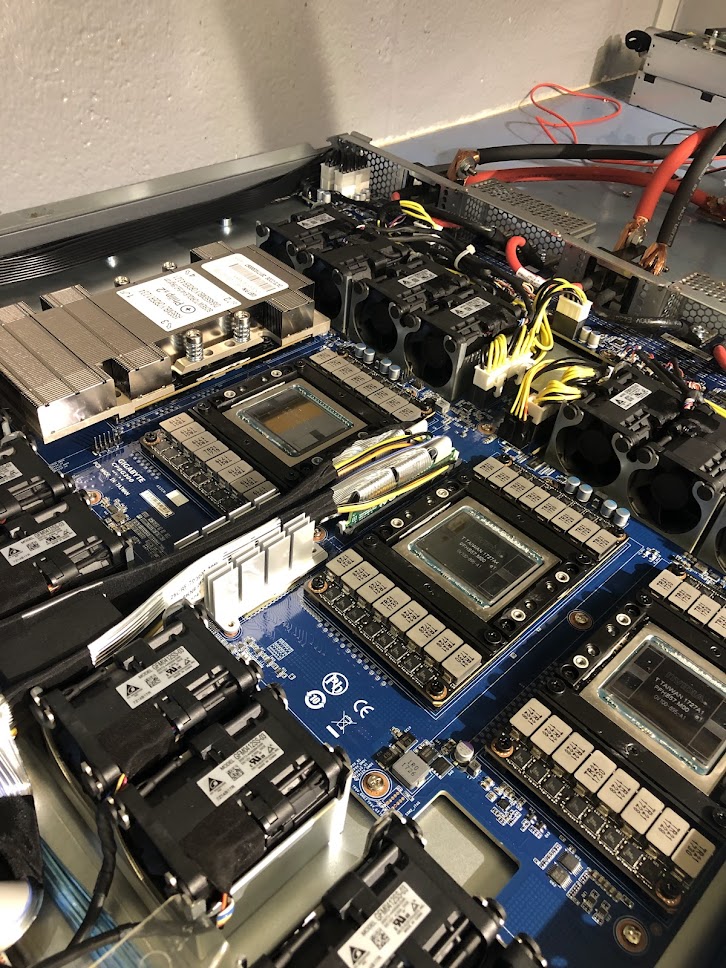
With CPU heatsinks installed, I installed one GPU for testing purposes. In the image below, the four SXM2 sockets are on the left, CPUs on the right, and PCI-e sockets are in the center right. Note the connection to the SXM2 board from one PCI-e socket, leaving the other two free for high-speed NIC switches to other server nodes. The PCI-e connection from CPU to GPUs is limited to 16 GBps (32 GBps bidirectional), but data transfer between GPUs on the SXM2 board is a juicy 300 GBps.

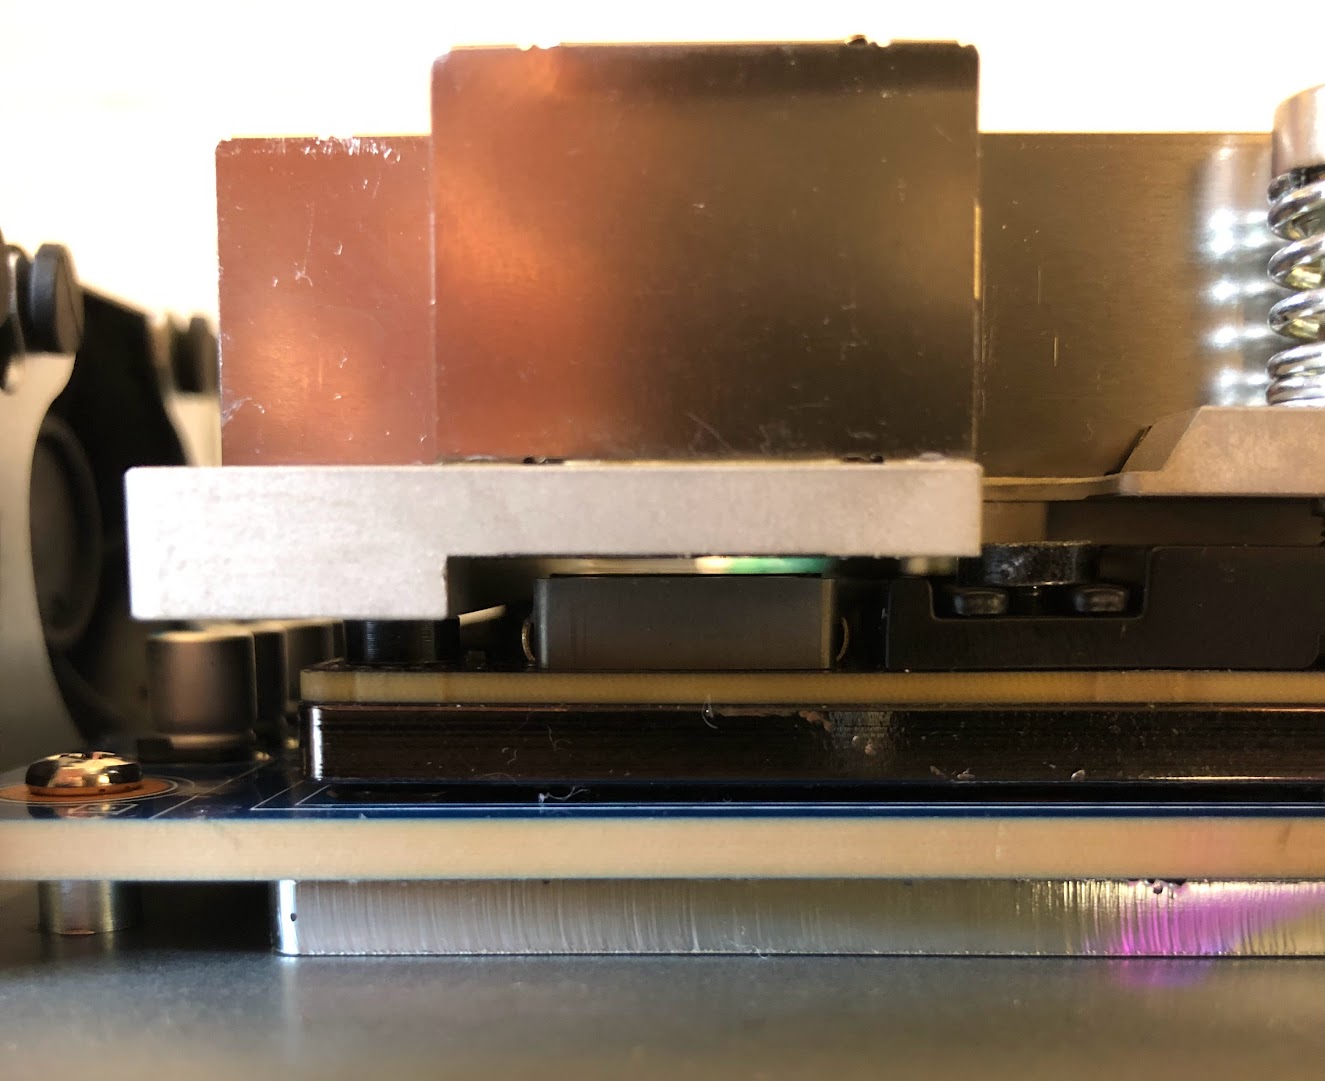
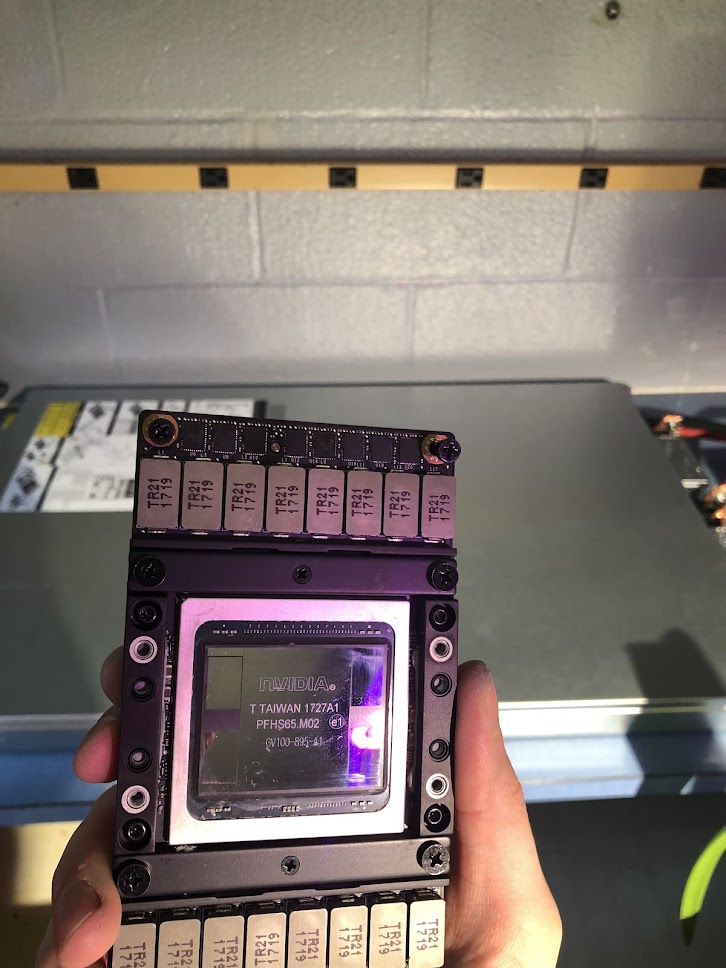
The V100 arrived nice and clean with a mirror finish on the lid. The large grey ‘TR21…’ modules are voltage regulators, and if you have seen an SXM2 P100 this will look very familiar except for the GV100 chip.
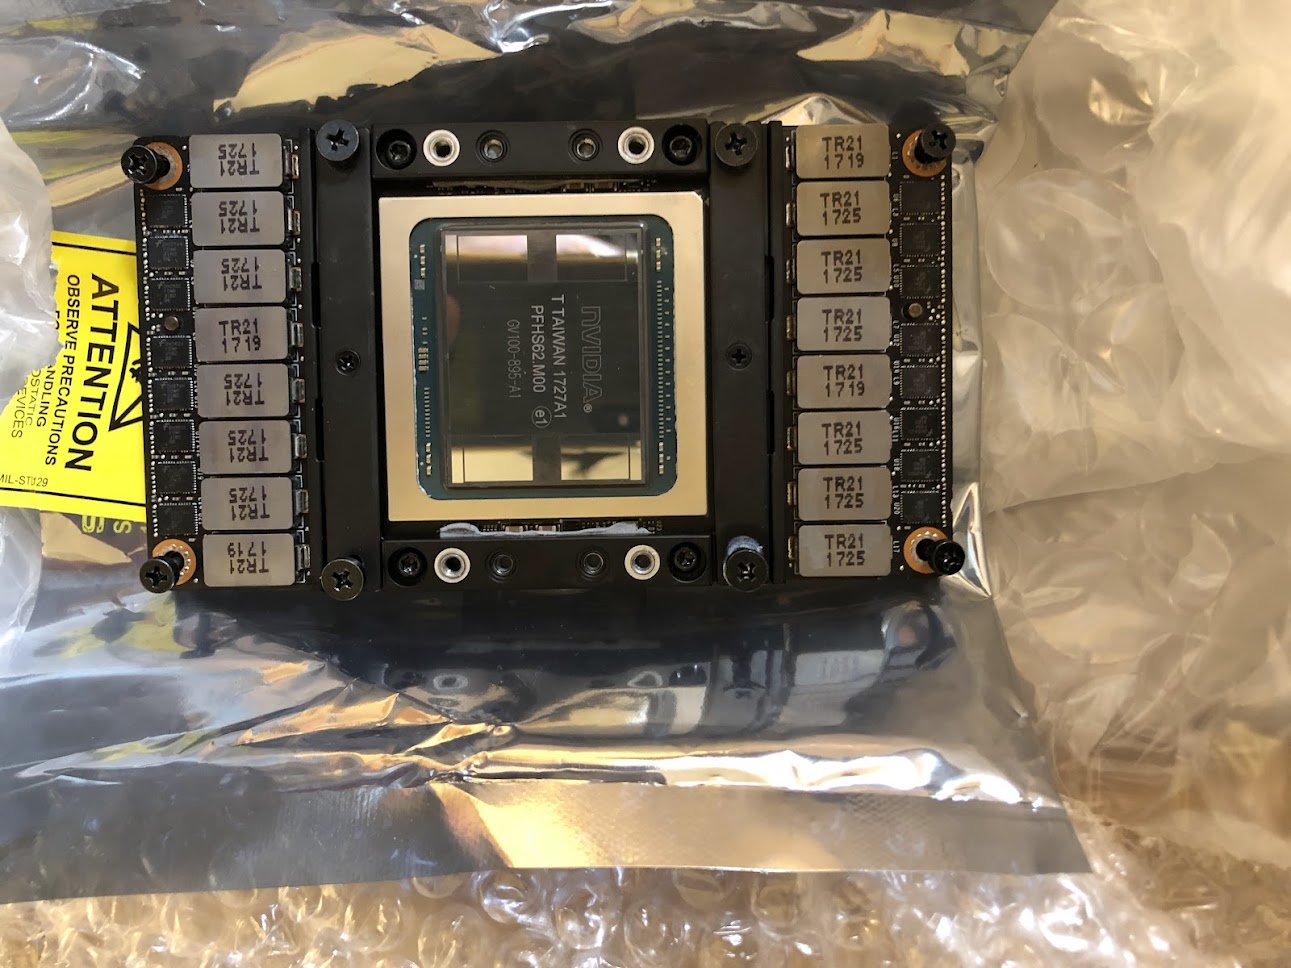
The hardware installation guide warns you that there is a very fine tolerance window for the screws that fasten the GPU to SXM2 board: less than 5%! This is because there are tiny springs used to modulate torque. It is recommended to use a precision torque screwdriver for installation, but I winged it with a small-bore screwdriver and lots of patience. To be honest, I would probably just get a precision screwdriver if I were to do this again: I had to go back and re-tighten both heatsink and GPU-board connections multiple times to eliminate various gremlins (a too-warm GPU, GPU that was not recognized at all, strange memory hangs resulting in process kills etc). To be frank, the SXM2 connection is not nearly as robust as a modern CPU connection, but this is a small price to pay for huge bandwidth I suppose.
The GPU heatsink comes pre-loaded with thermal paste, nice!
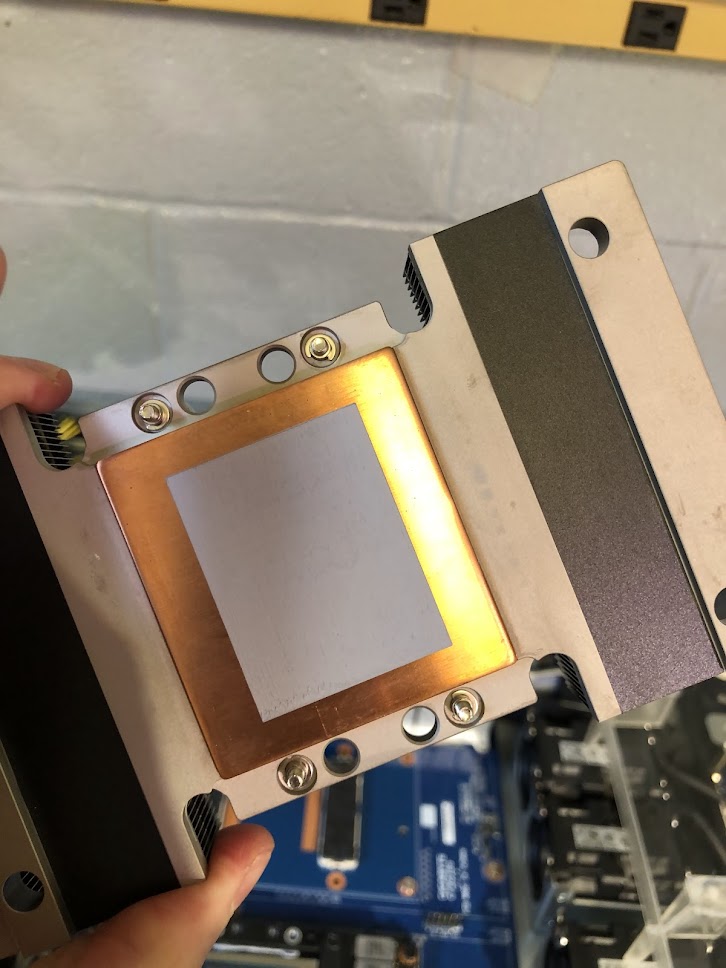
The heatsink has a nice thick base plate and large fins, and is around six times the size of the CPU heatsink.
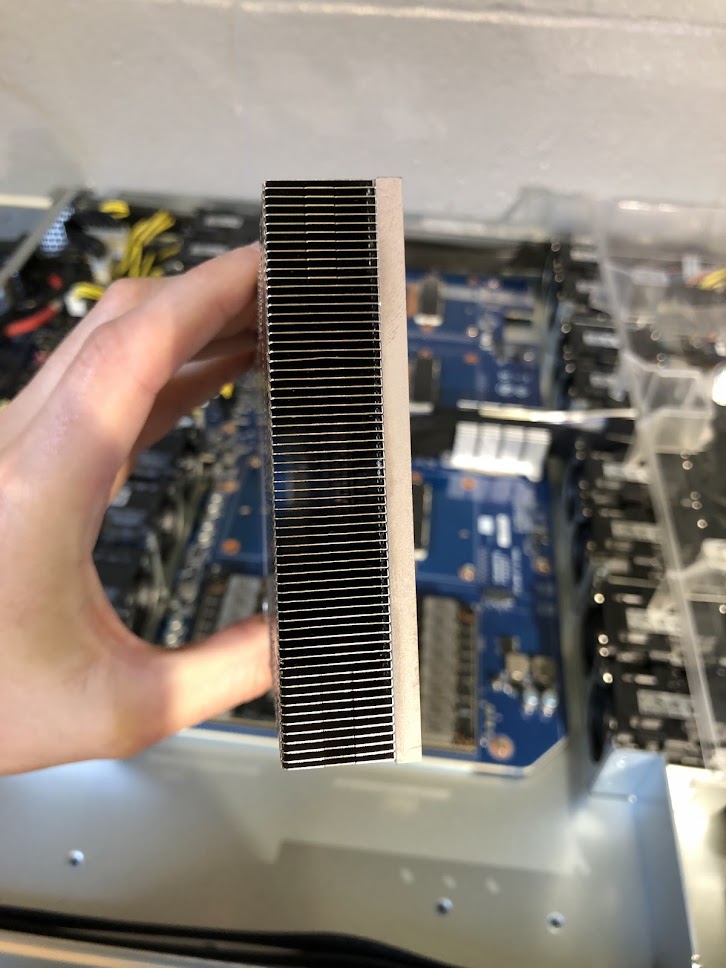
There do not appear to be any heat pipes in the GPU’s heatsink, just a hefty base plate (the center of which is copper) and closely spaced fins.
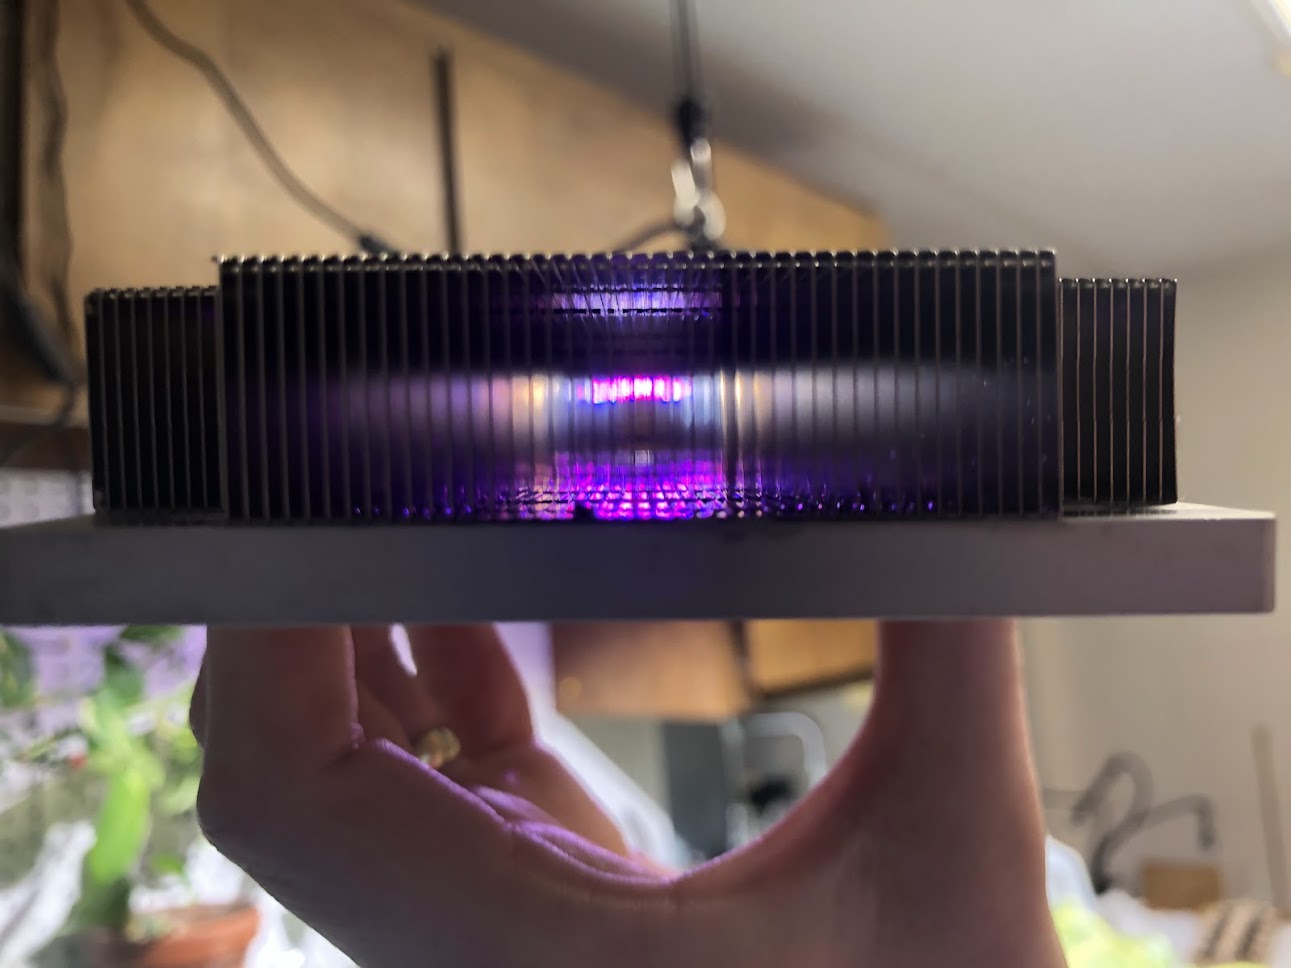
The heatsink also has a small tolerance window, but with springs it is not quite as small. Here is a side view of the GPU and heatsink after installation. Interestingly the voltage regulators do not contact the heatsink.
With that, the first GPU is installed. In the image on the right (below), air moves from right to left.
Power Supply Units
Now we get to a tricky part: powering a 1OU OCP server outside its native habitat (an OCP rack) using power supply units (PSUs) designed for different servers. Whilst most of the safety features of PSUs are retained when doing this (over-draw leads to current trip and shutdown etc.) this is obviously not the intended use of these components and therefore the manufacturers cannot be expected to have planned for it. If you are planning on assembling your own OCP server, proceed at your own risk.
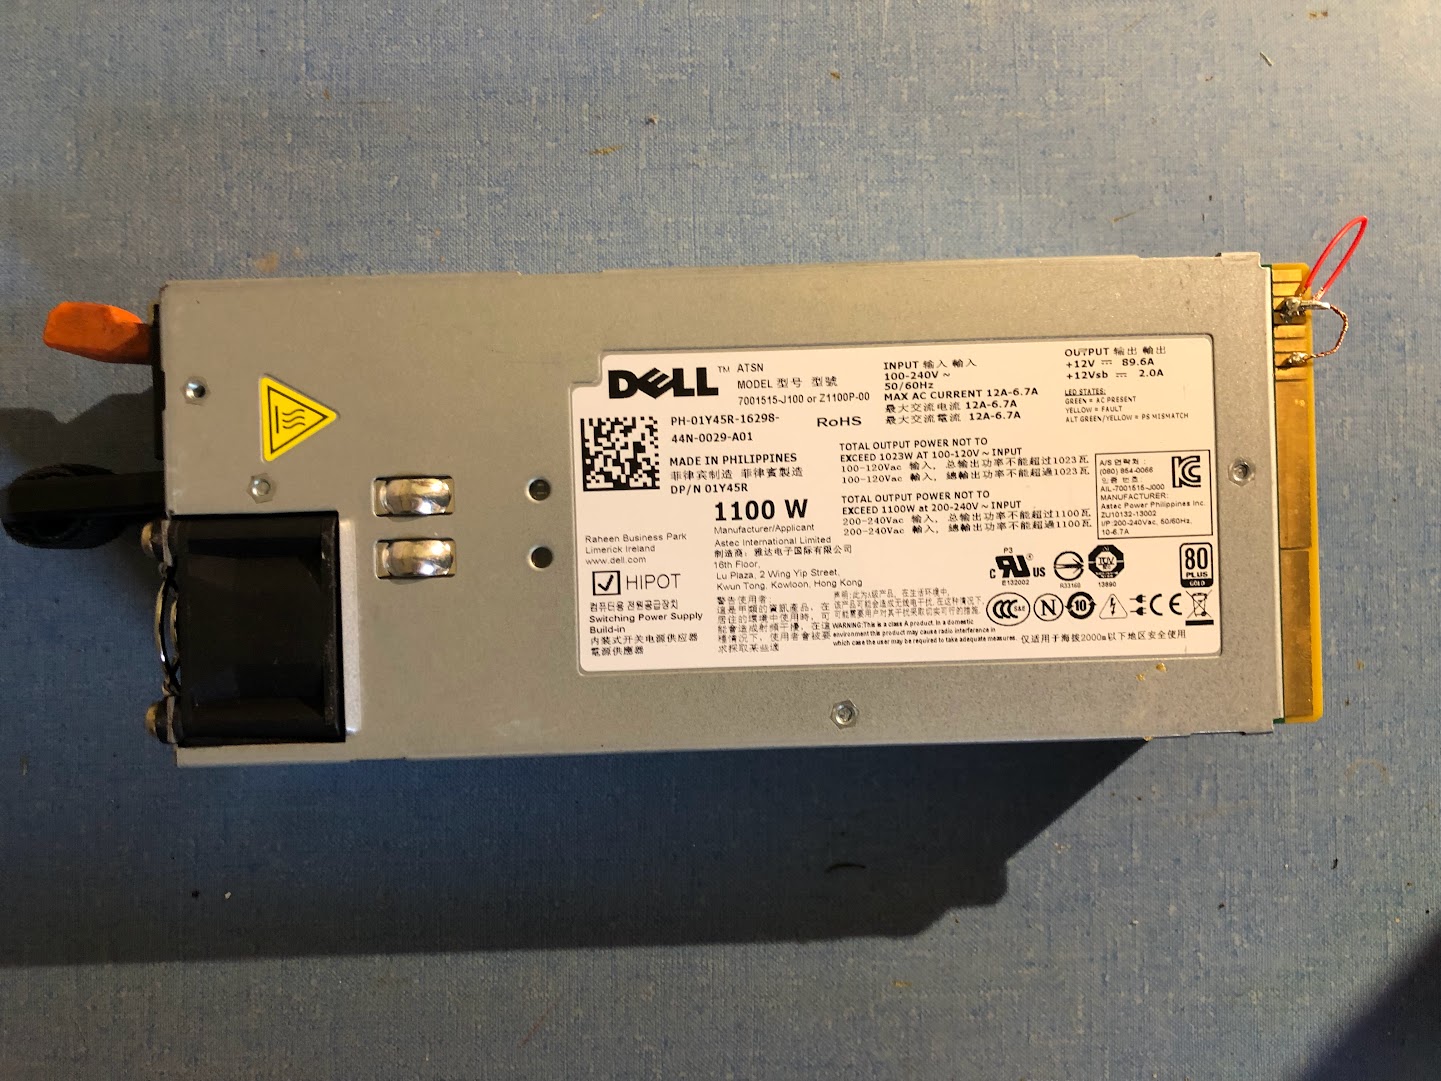
With a total TDP of around 1500 watts for the chips alone, perhaps the simplest power supply would be a 2000W dell server PSU. Unfortunately these require 240V AC inputs, and I only have 120V outlets. Happily however other dell server PSUs are designed to be run in parallel as they would be in their native environment, so instead we can just use two 1100W PSUs in parallel (with the current sharing pin connected to avoid burning out one while the other idles). 1100W dell PSUs are very inexpensive on ebay, so I got a couple and started breaking them out, ie making them run outside their intended environment. I started with dell z1100p PSUs, not to be confused with l1100e supplies that have very different pinouts.
One can buy breakout boards for this purpose, but I thought it would be more fun to solder the connections myself. This turned out to be more difficult than I had anticipated, and it turns out that you have to first draw one pin to a GND, supply power and wait a few seconds, and then connect two ‘switch’ pins together to complete the power on. One of the strangest sequences I have seen for a power supply, but at least it works.
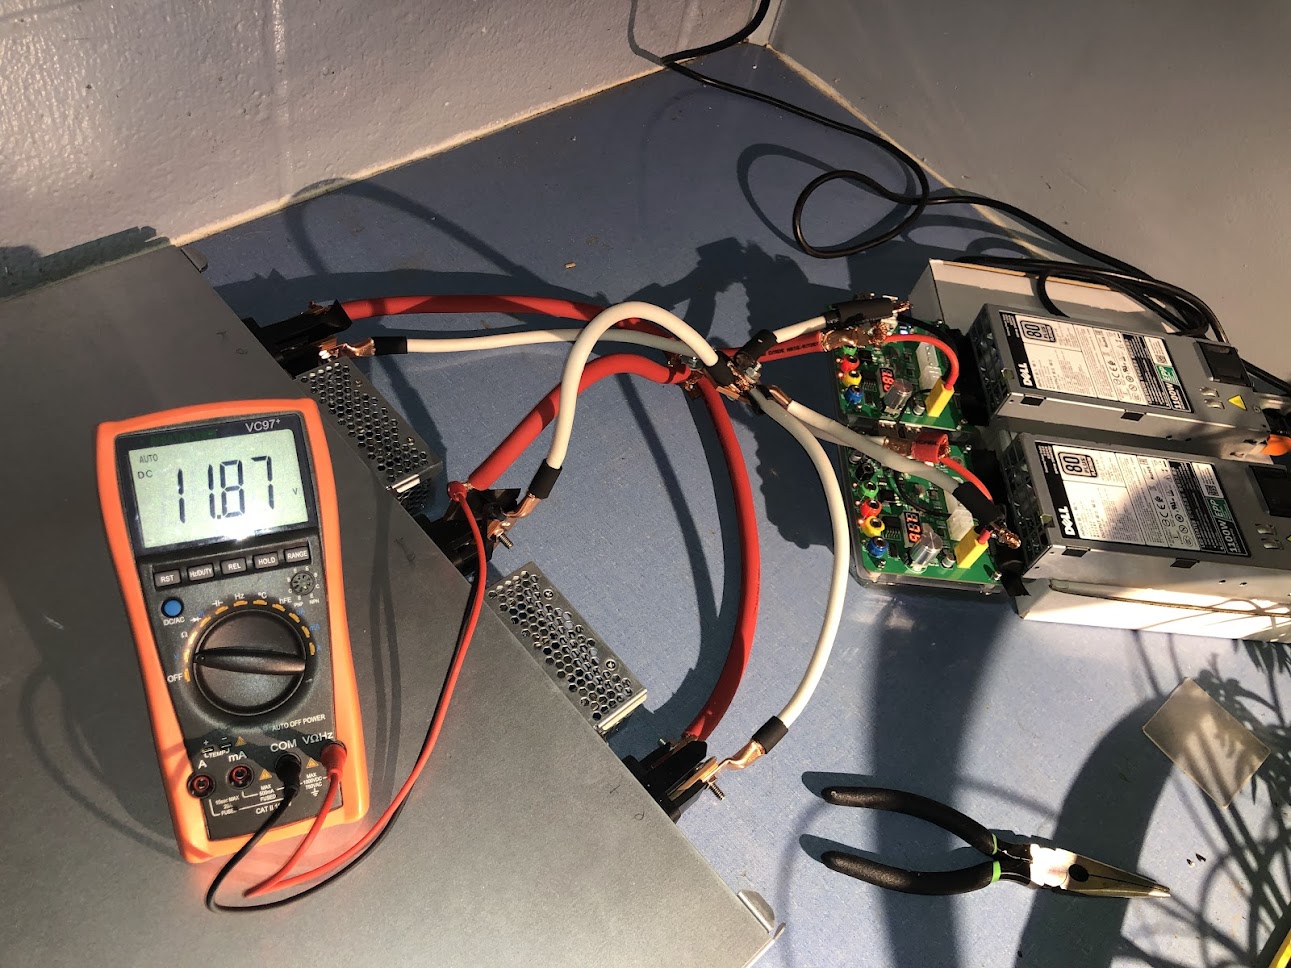
Power must be supplied to each of the sockets on the right of the server in the photo below (actually one can also bypass the sockets and install a cable into the cages next to the sockets, but I thought this would be more of a pain to do). Each socket has a +12V (left) and GND (right) connection, and the server expects 80 amps per socket.
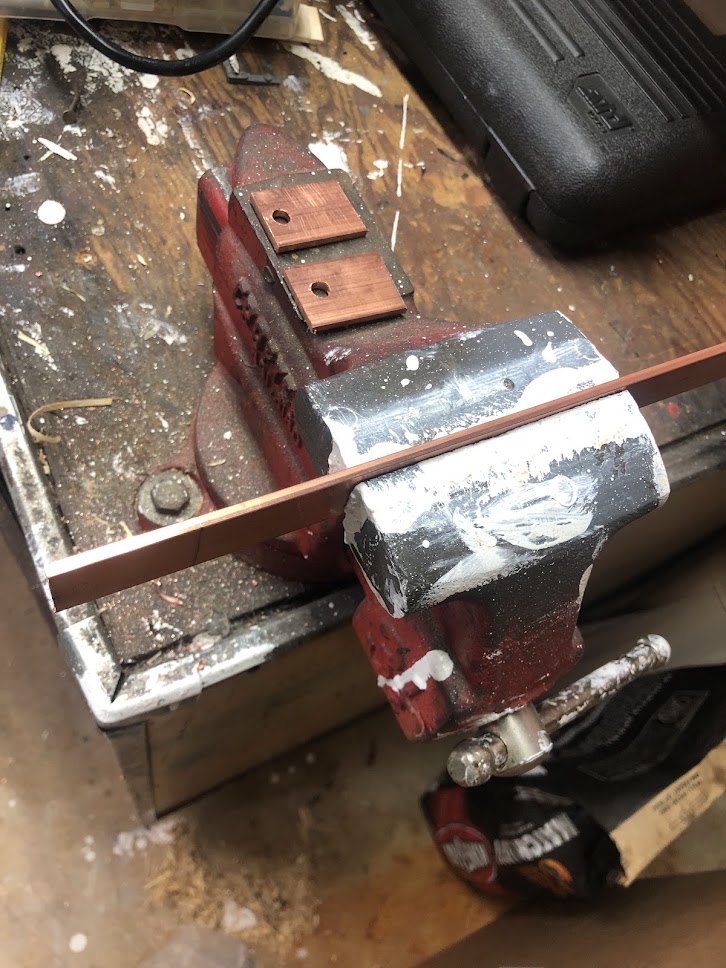
To get the power from the PSU to sockets I used a combination of 4 AWG battery cable and 1/8” thick by 1” wide solid copper bus bar used to insert into the sockets, and for collecting the inputs for the +12V and GND. The 4 AWG cable turned out to be overkill, and I would choose 6 or 8 AWG if doing this over. To make things simple, standard convention is followed where red is HIGH +12V (nominal) and black is LOW, 0V.
Sawing the bus bar into chunks and drilling for connections allows for one bus bar in each power socket.
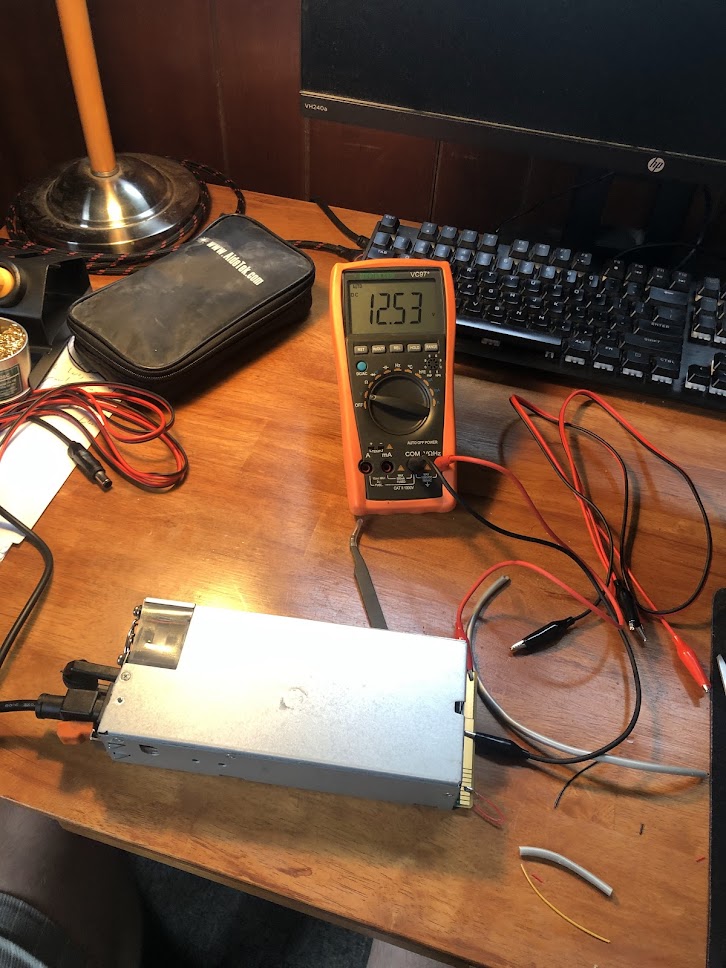
Connecting things together with the appropriate hap-hazardness that indicates a test, we have a successful power connection.
While performing these tests, I noticed that this PSU tended to modulate its fans in response to current draw (which is good) but that it tended to be rather warm when the system itself was powered down (bad, indicates parasitic current draw). Because of this (and because I accidentally stripped a pin during a de-solder process of one of the PSUs) I switched my original plan to instead use a similar PSU but with breakout boards.
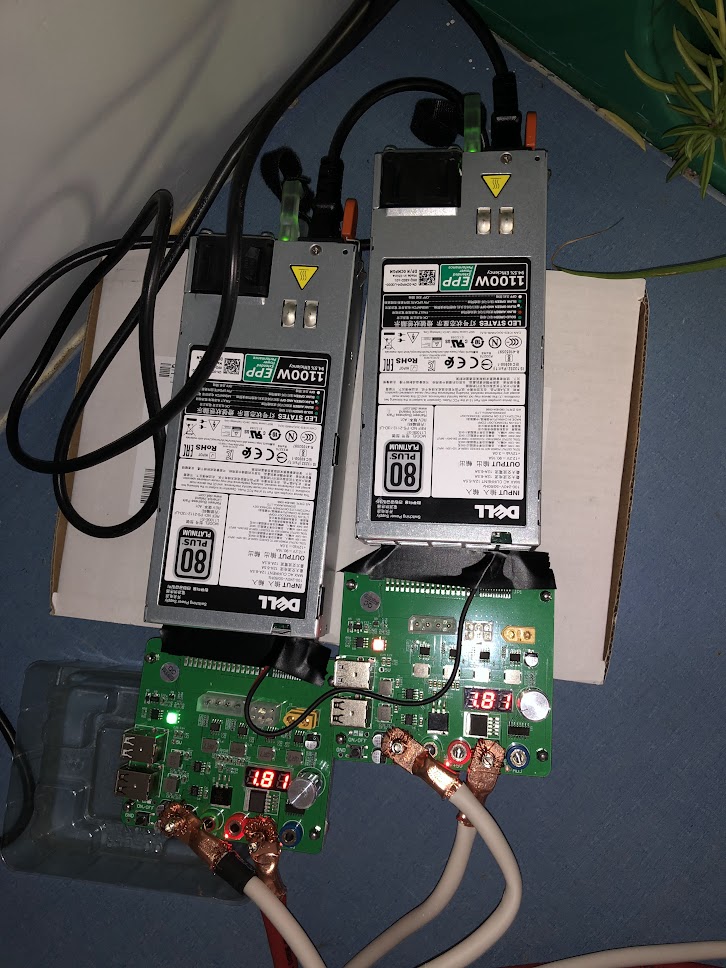
The new PSUs are two Dell l1100e-s1 modules with adjustable breakout boards from ebay. There is some voltage drop from the breakout board output to the server power socket, but both PSUs are recruited during heavy workloads even without further coordination. This can be seen during experiments where the wattage pulled is greater than a single PSU’s rating if we use only a single PSU: doing so results in a reset of the PSU and system crash, and unfortunately fried one of my RAM stick in the process. With both PSUs connected there is no such failure.
I also connected the current share pins (which is pin S7) of the two PSUs in an effort to get them to coordinate better under high load. This connection can be with very thin wire as it carries virtually no load (<500mW), so I used insulated AWG 20 wire (black in the picture below) inserted directly into the breakout board pin opening. I also used proper copper ring lugs to make the high-current connections to and from the sockets.
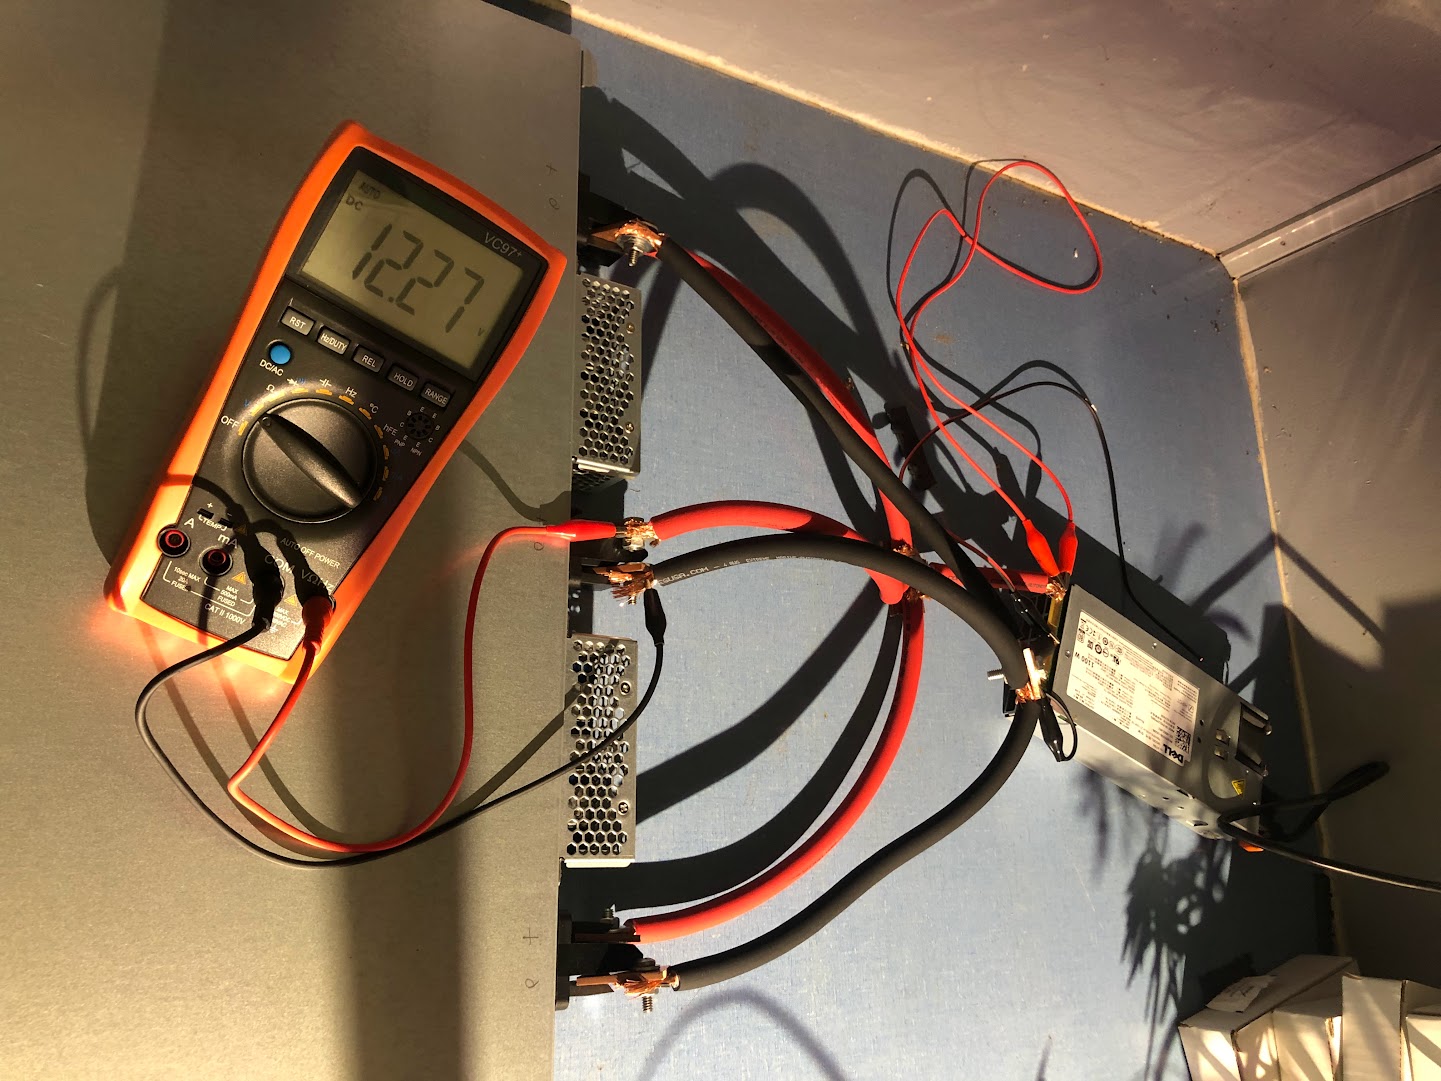
This effort was moderately successful, but there is still a sizeable voltage drop under high load (all four GPUs at ~300W + 200W CPUs + 200W other = ~1600W) which can lead to GPU under-volting and GPU bus drop if this amount of current is drawn for extended periods of time. It was not uncommon to see terminal voltages around 11.2V in this configuration under high load.
Unfortunately, under high load (all four GPUs running) over extended periods of time I found that the bannana plug breakout board connections were getting much too hot such that one of the plug’s plastic sleeves ended up melting within the first few dozen experiments. The bannana plug in question was loose and probably would not have melted the plastic if it was tight, but the plugs tend to get loose over time spontaneously. It turns out that the common bannana plugs such as these are rated for only 15A, and at 1kW we would expect both PSU’s plugs to operate at 42A if they share the current load perfectly, so it is not surprising that the bannana plugs were overheating.
The highest-rated plug on these breakout boards is the XT60 plug in the upper right: this is rated for 60A at 30V DC, meaning that a continuous draw of around 45A at 12V should be pretty safe. I got some XT60 male plugs with leads and attached those to the existing terminals as follows:
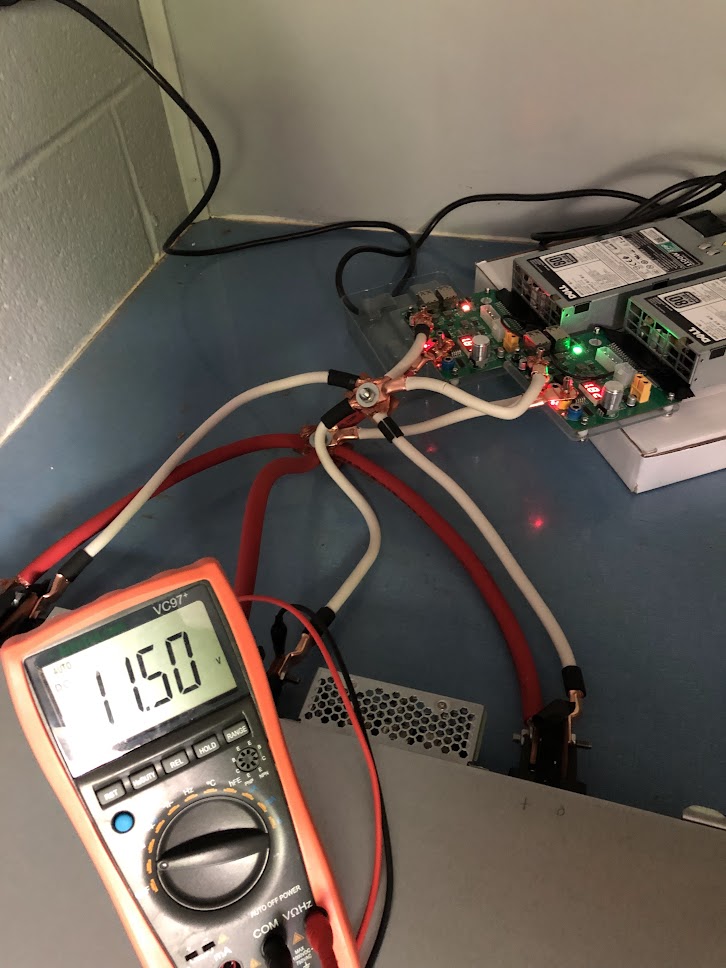
and sure enough the plugs get somewhat warm to the touch but not hot under load. The XT60 plug setup also prevents the voltage drops that I was seeing when the bannana plugs were used, and the voltage rarely drops under 11.85V under load. Here is the voltage at the terminal under around 1.1kW:
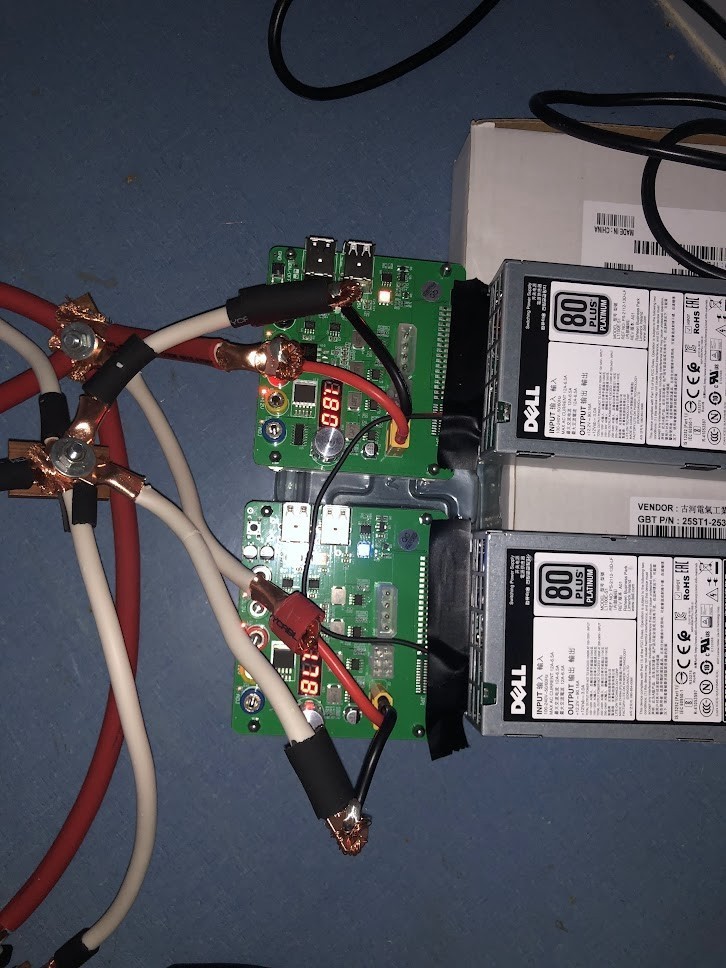
The XT60 plug also allows us to run the GPUs at full power (~1600W total for the server) for extended periods of time, although the plug itself and the PSUs get rather warm if no external airflow is provided. Under full load there is somewhat more of a voltage drop at the terminal, with minimums around 11.60V, but no power loss or GPU bus drops. To deal with the warm XT60 plugs and PSUs, I added small 12V blower fans that you can see in the following image. The temporary power connections were also replaced with more permanant ring terminals, and the two z1100p PSUs make a nice heatsink and support.
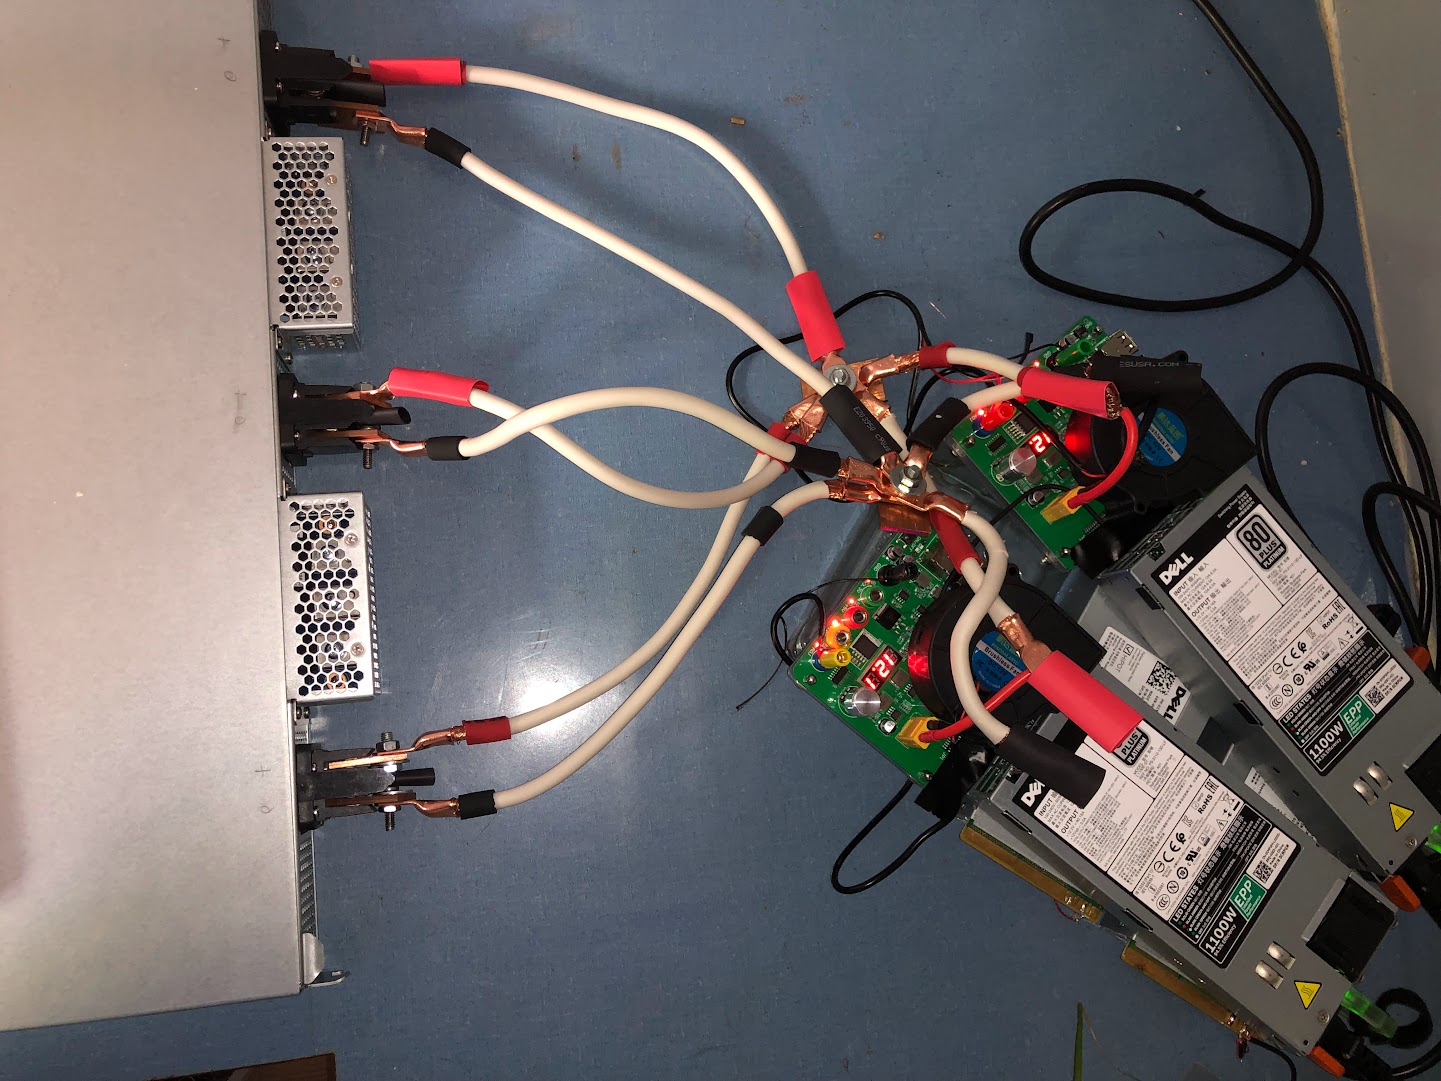
Due to the power and heat and noise reduction for a slightly larger performance degradation, I tend to limit the power to close to 200W per GPU, which degrades performance only slightly. The plugs and PSUs tend to be much cooler with this limit, especially with the blowers running. The eventual plan is to add a third PSU for redundancy so that any one unit can fail without killing the server’s processes, and with the added benefit of reducing the power drawn from each PSU and through each XT60 for increased longevity.
UPDATE: The third and final PSU has been added. This turned out to be necessary for stable training runs where all four GPUs tended to ramp up and down very quickly (as happens during DDP training under certain conditions). When that happens the sharp increases in GPU power draw (which appears to occur in the microsecond timescale) are too much for even two Dell l1100e PSUs, and the supply under-volts (~11.4 V at the server terminals) and the GPUs drop off the SXM bus, even with limited clock speeds and lower power levels. The addition of a third PSU happily prevents this issue even when the V100 clock speeds are not limited and the power levels are not lowered from the default TDP of 300W. I have also added small aluminum heatsinks to the XT60 plugs, which seems to keep them somewhat cooler.
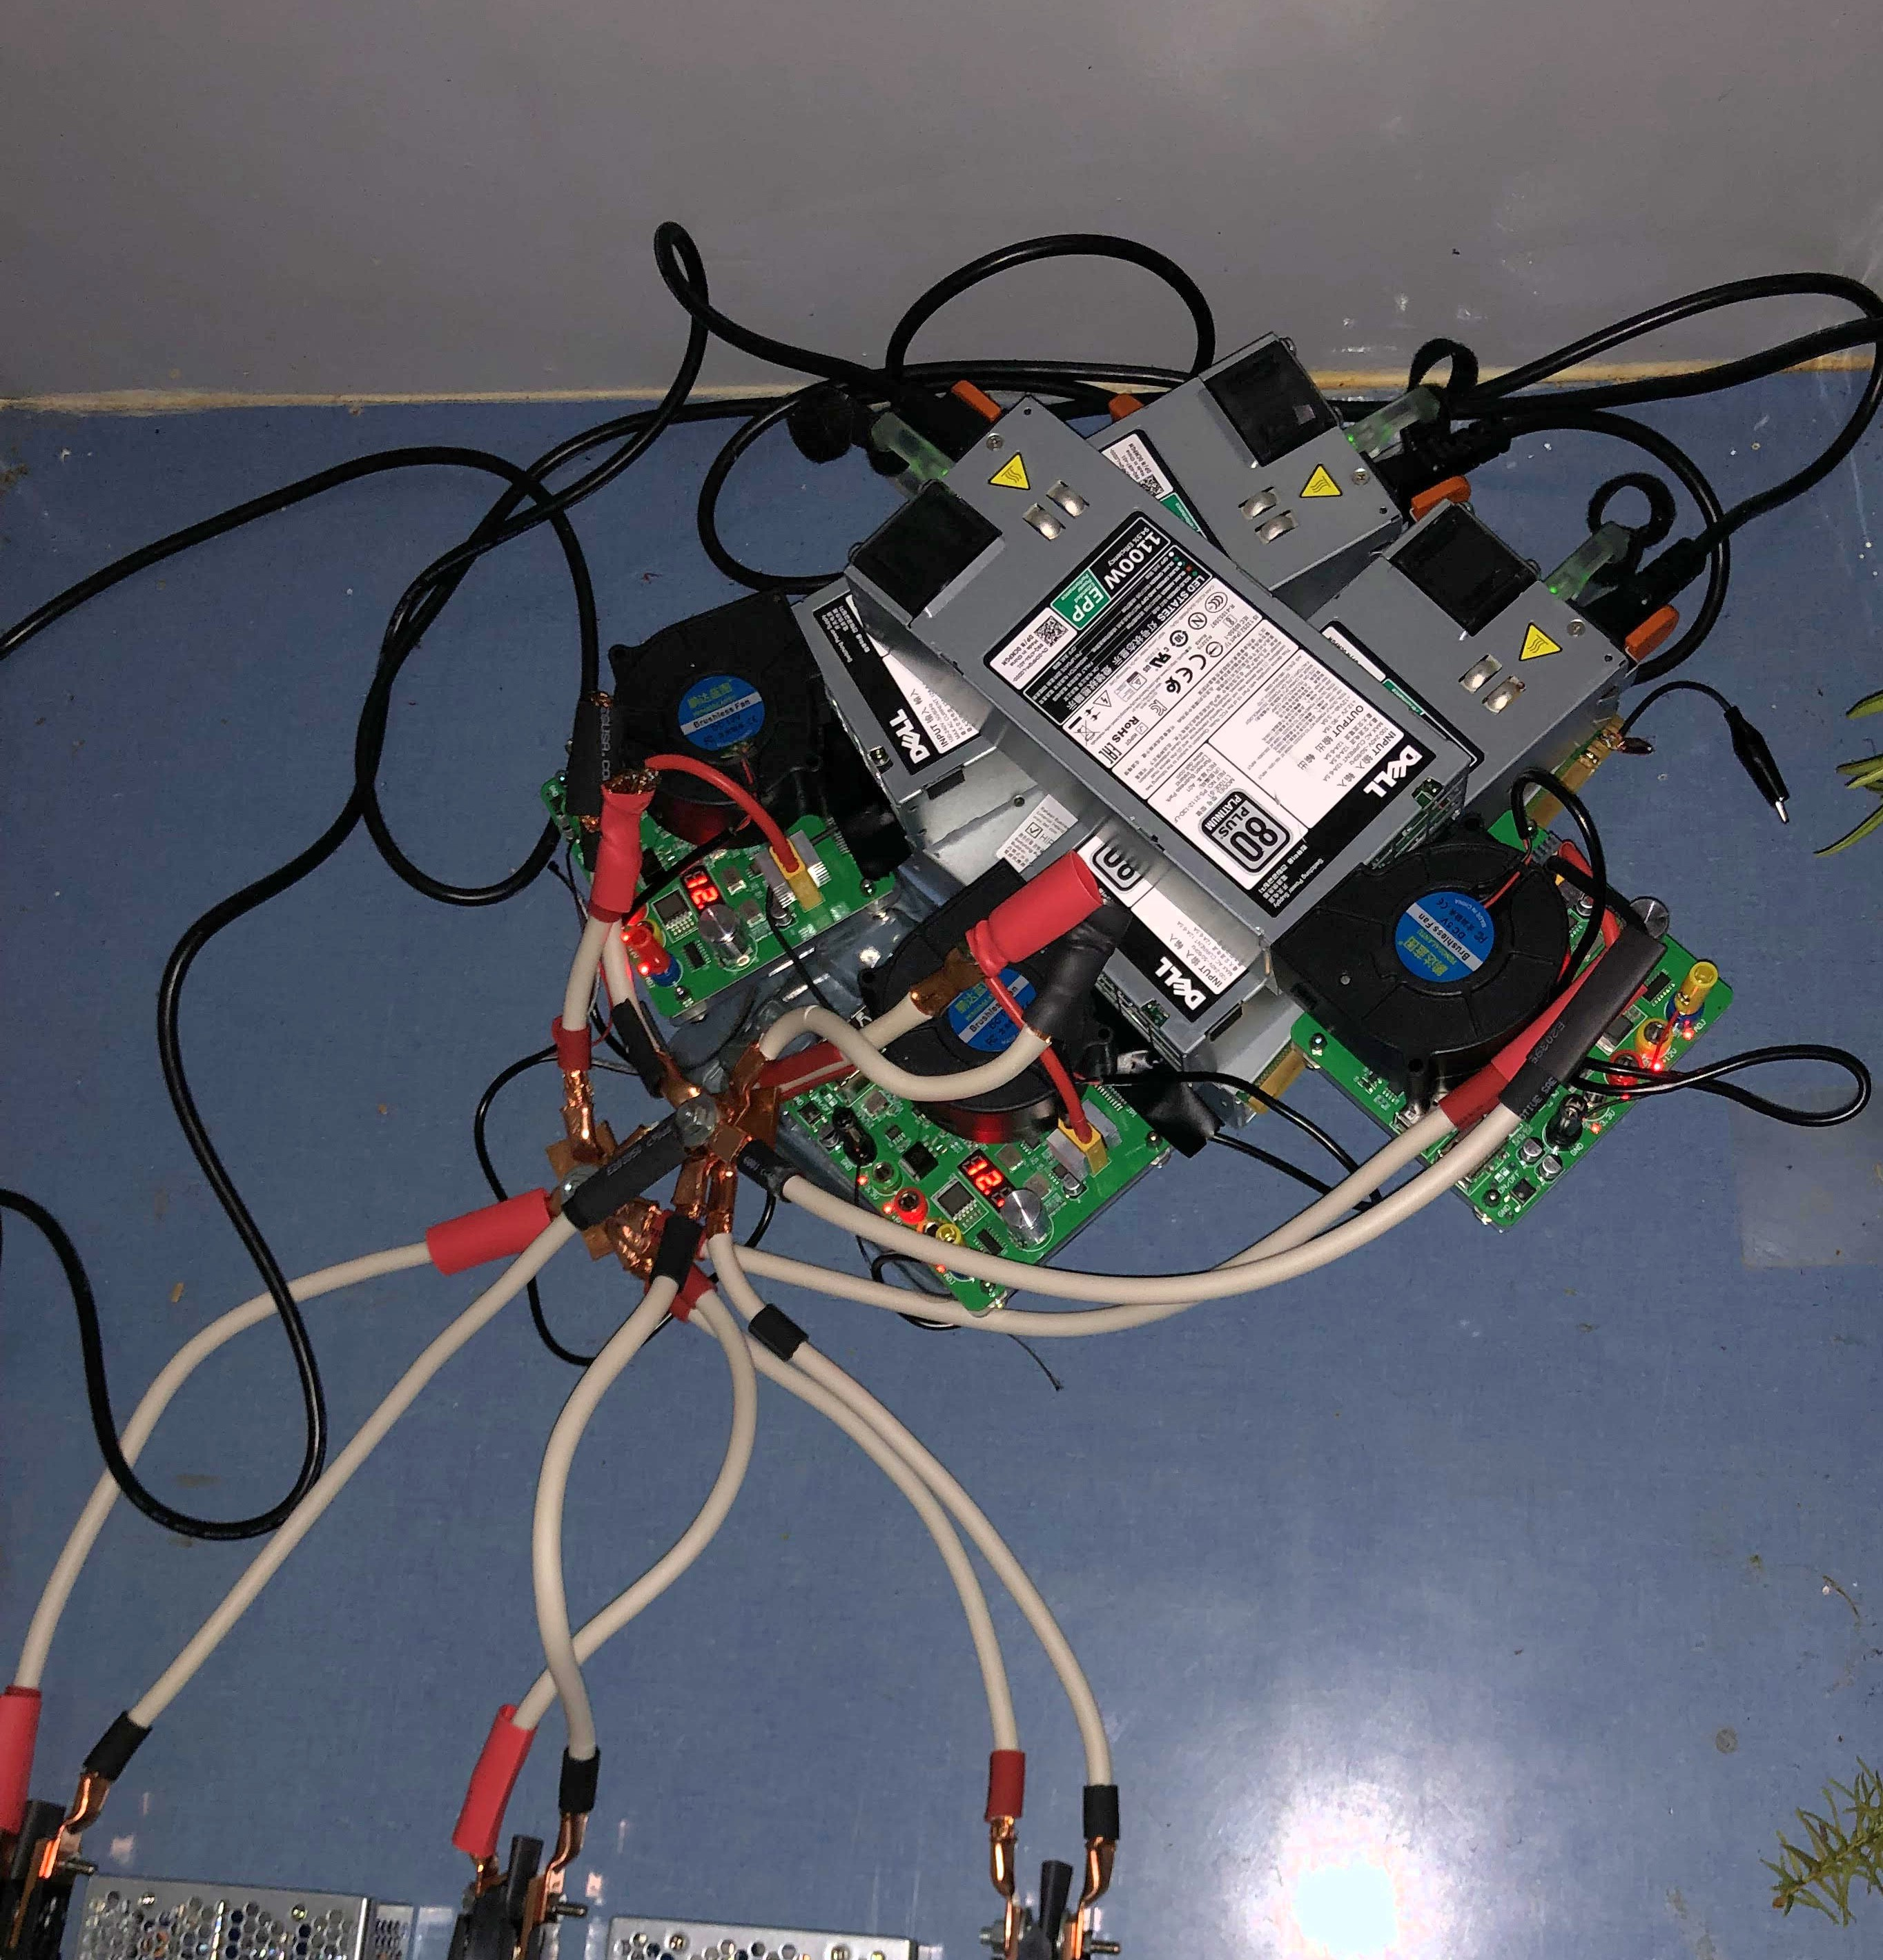
Since writing the above, I experienced a slow degradation in voltage at the server power terminals such that GPUs began to drop off the bus once again. After some investigation, this turned out to be due to poor connections between the xt60 wires and the copper ring terminals: it turns out that simply wrapping these wires around a lug results in poor connection and thus significant heat and corrosion over time, particularly on the hot (+) terminal. With the same PSUs, simply replacing this connection with two ring terminals (one for each +/0 xt60 wire, one for each +/0 bus wire) bolted together results in much higher full-load server voltage (12.06V at the terminal), with virtualy no fluctuation during training and no more GPUs dropping off the bus. If you plan on DIYing a power supply like this, pay extra attention to all your high-current connections as a single bad one will cause a significant voltage drop.
It turns out that much of the heat observed on the xt60 plug was also due to these poor connections. After installing the double-ring bolt connections, the xt60 plugs no longer feel warm to the touch even after extended runs. It appears that most of the heat felt on these plugs actually came from resistance in the downstream connection, as with more testing the xt60 itself handles 60 amps continuous at 12V without getting hot.
Test
The I/O ports are suprisingly comprehensive for a server: one VGA, three RJ45s, and two USB ports.
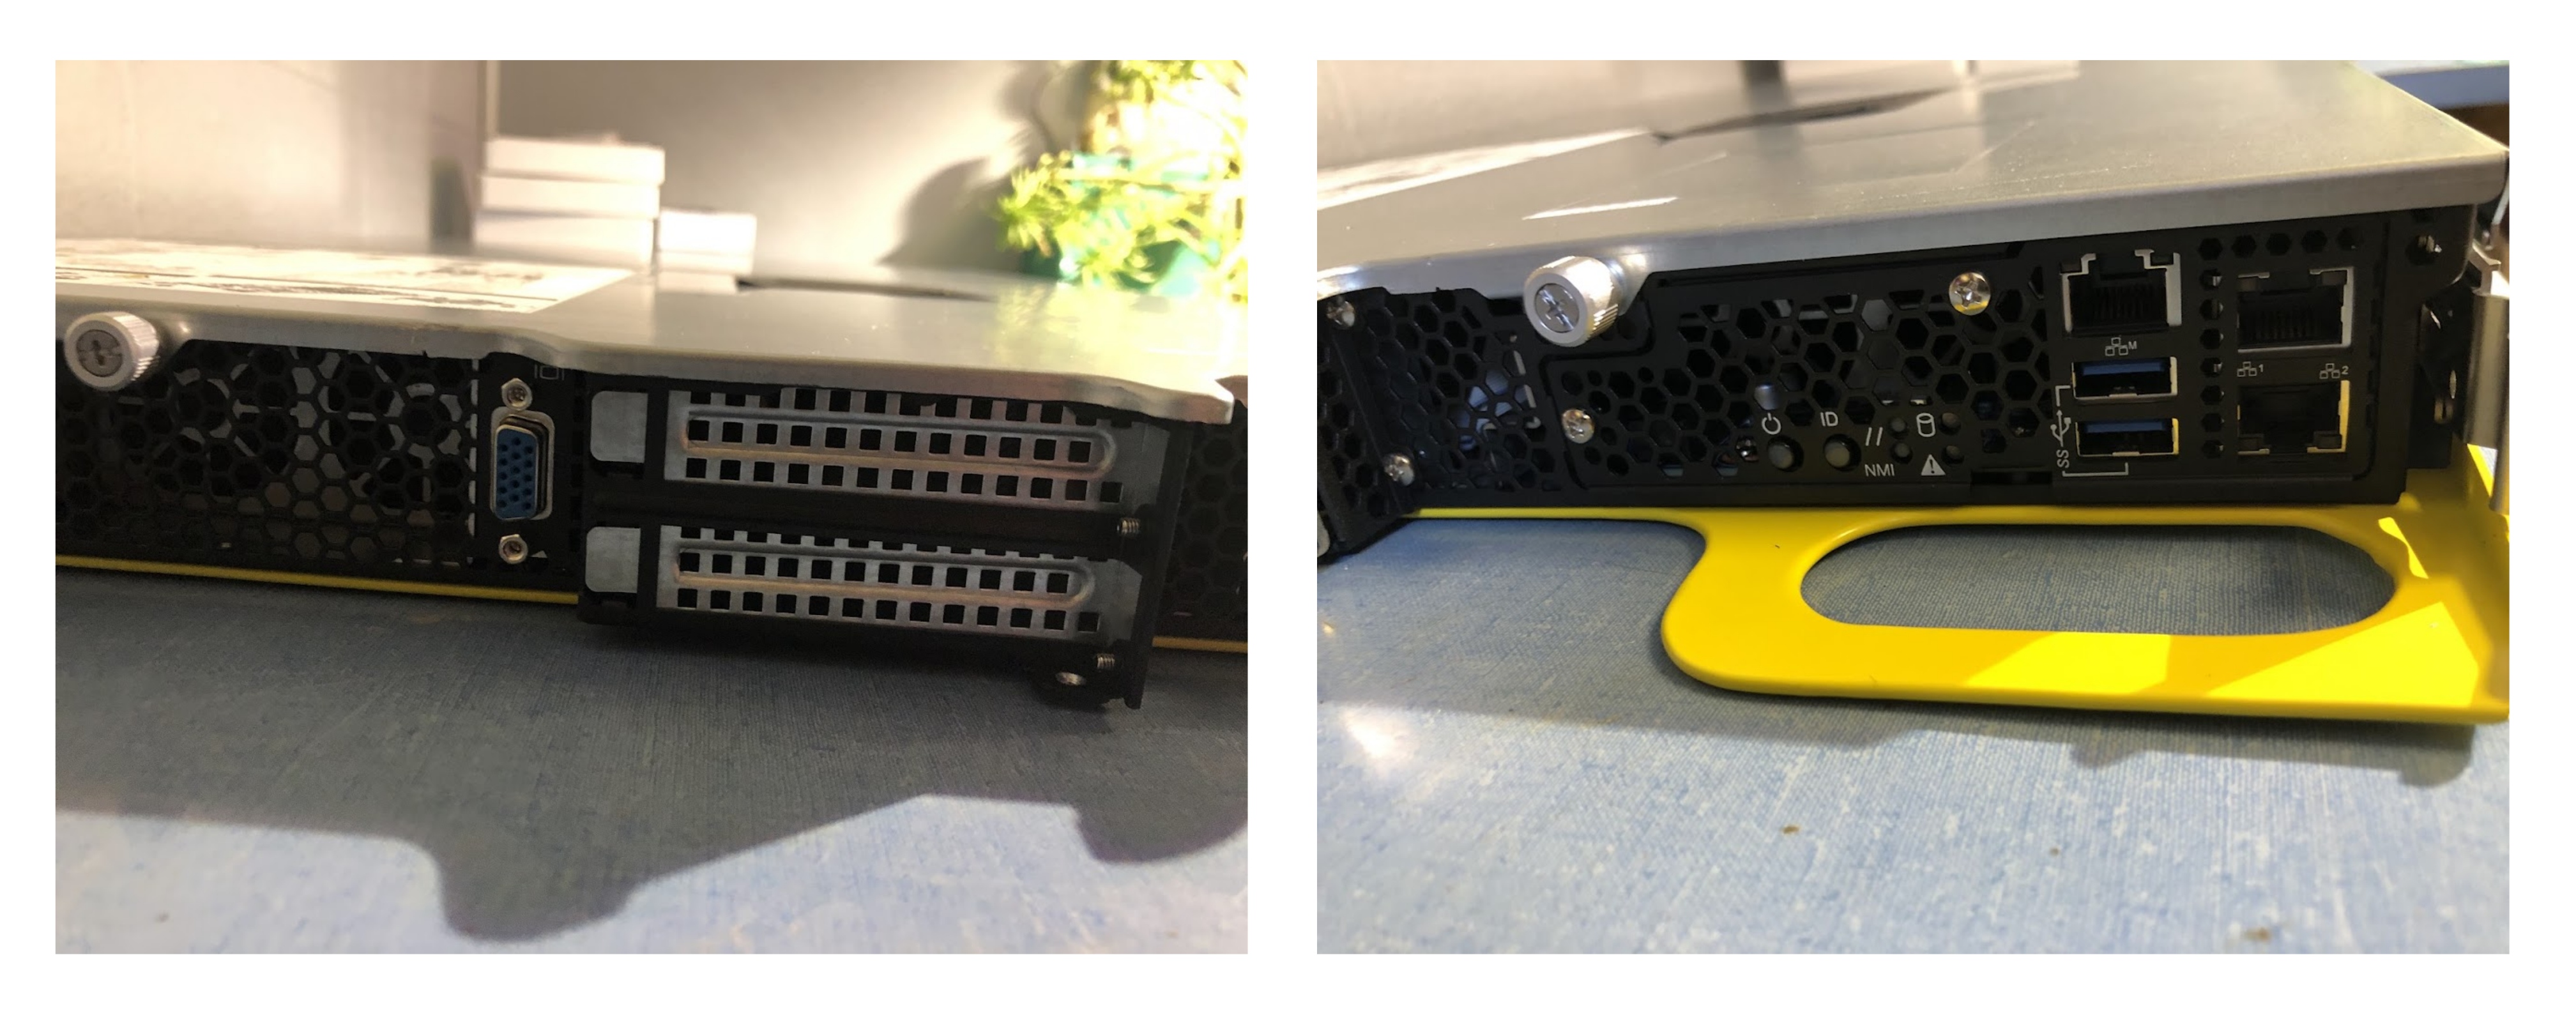
This makes it easy to connect a monitor, keyboard, ethernet connection, and bootable USB (to install ubuntu-server). There is no reason to connect a mouse as ubuntu-server has no GUI be default (although it is easy to install one). As I am going to ssh into this server for almost everything, I did not install a Desktop GUI.
After powering on, it POSTs! Much of the hardware in this HPC server is managed by Penguin’s software, making a linux OS even more fitting.
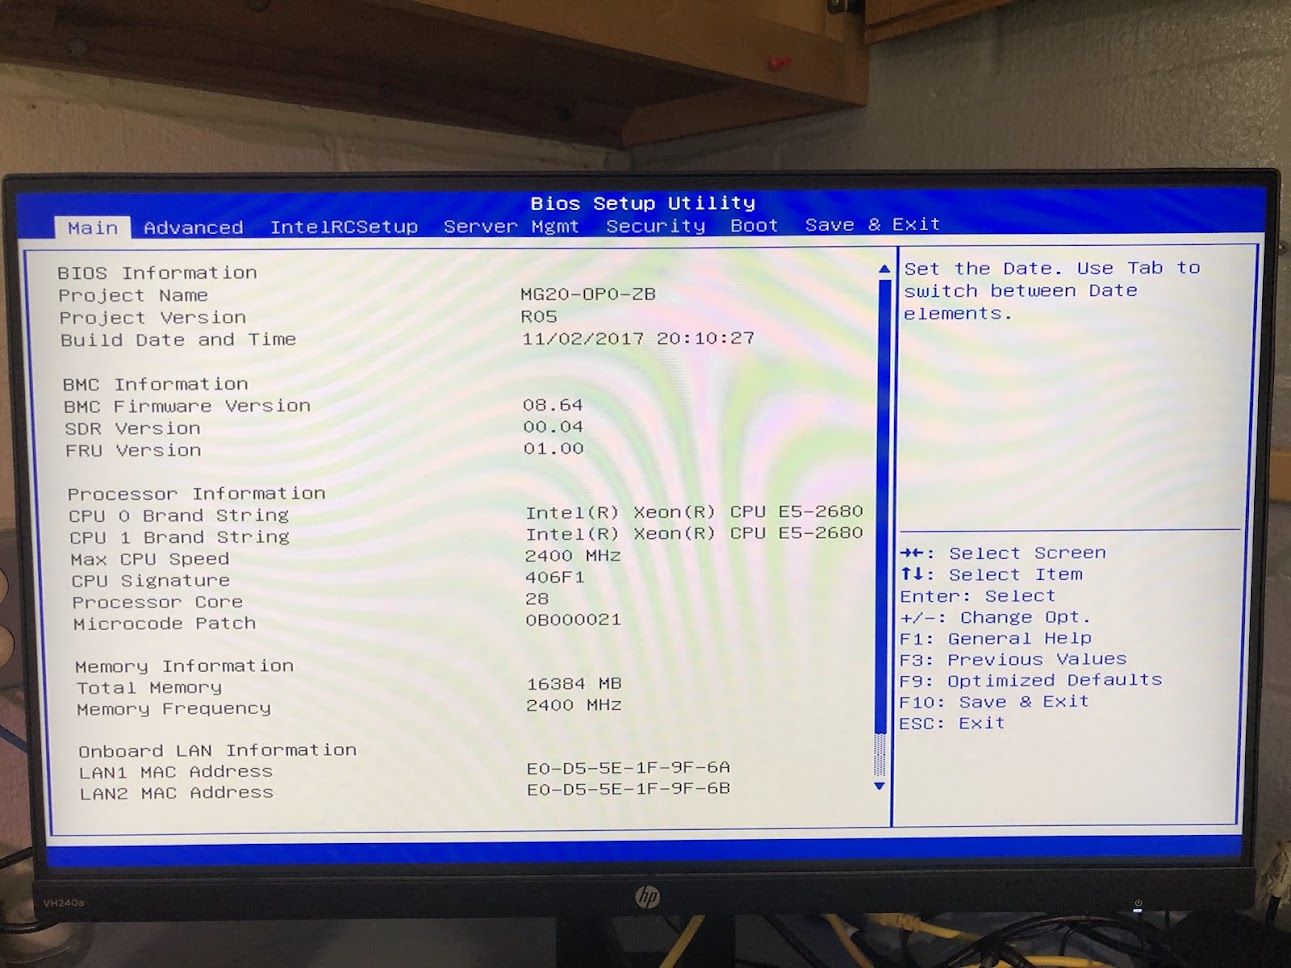
Heading to the BIOS, we find that both CPUs are recognized, the memory is performing at its maximum speed (2400 MHz) and that the server was built in 2017.
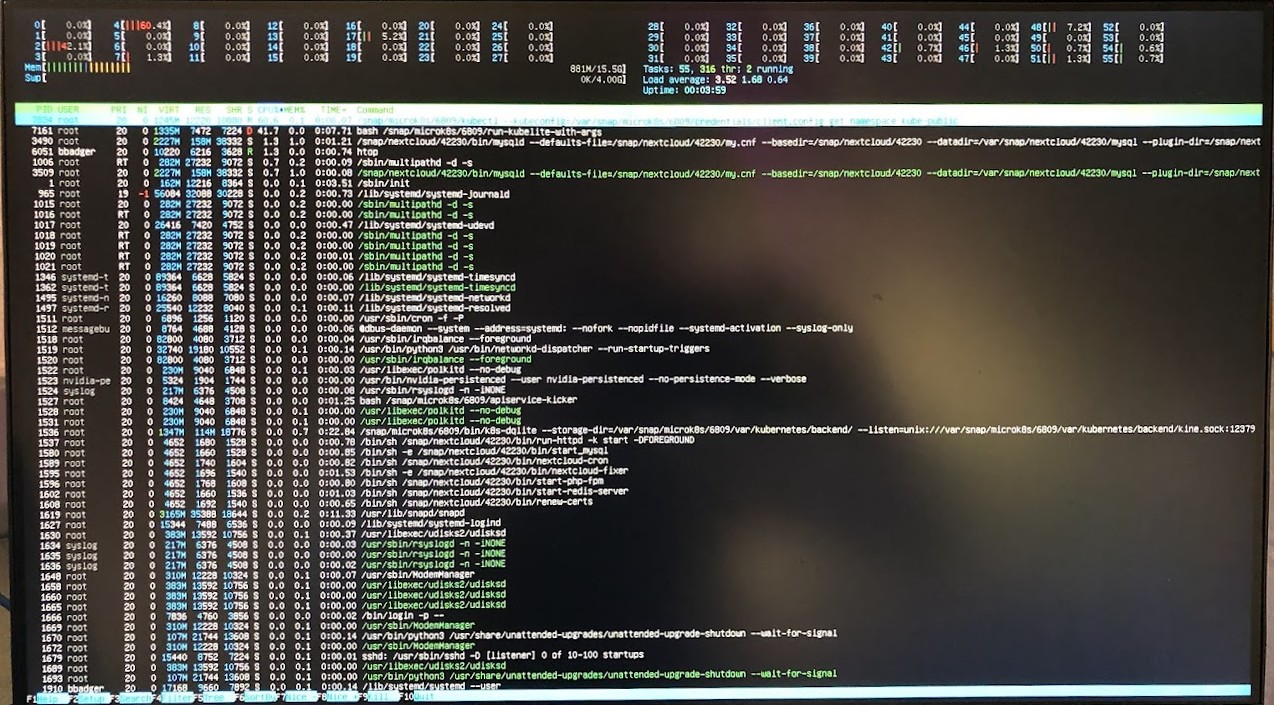
After installing ubuntu-server, we can check the internals. All 56 threads are active, and not terribly busy which is great.
After checking that the GPU hardware with sudo lshw -C display and finding our V100, installing the proper NVIDIA drivers and rebooting allows interfacing with the GPU. Et voila, our V100 is found and is idling (although in performance mode, interesting).

There are various CPU performance modes available in the BIOS, and I went with maximum performance as the TDP for each CPU is not very high.
Installing the rest of the hardware
With the test completed, I went ahead and installed the rest of the GPUs and memory sticks. Unfortunately the rest of the GPUs were not pre-cleaned, so I had to wipe some thermal paste off the chip lids.
I seated the GPUs first before installing the heatsinks. Note that you should never attempt to run a GPU without a heatsink! It will rapidly overheat, although it may turn off automatically if you are lucky before the DRAM is damaged.
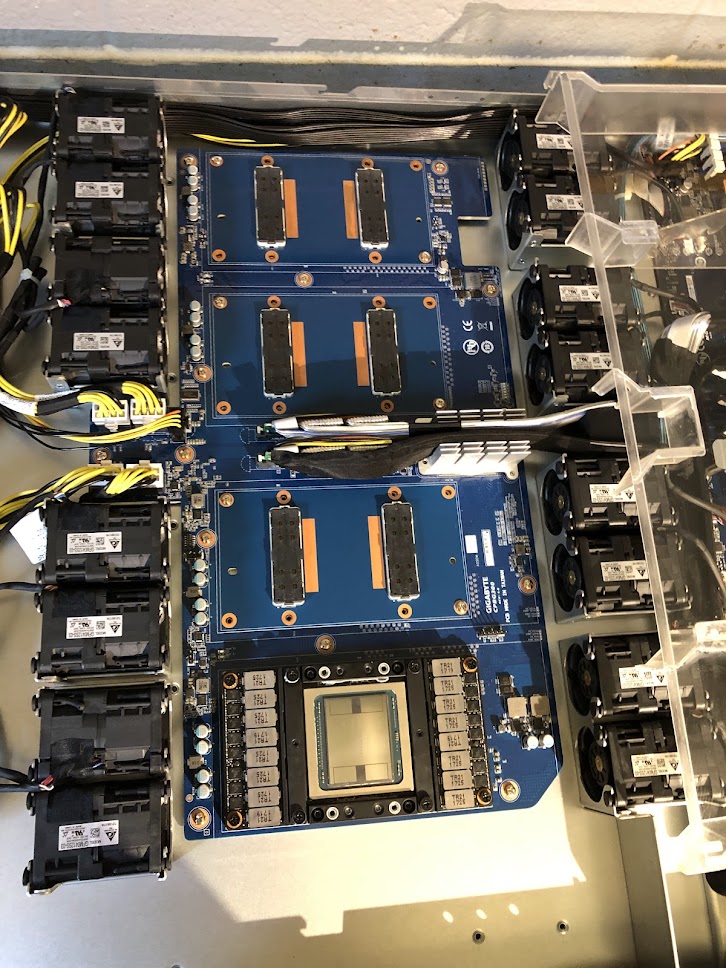
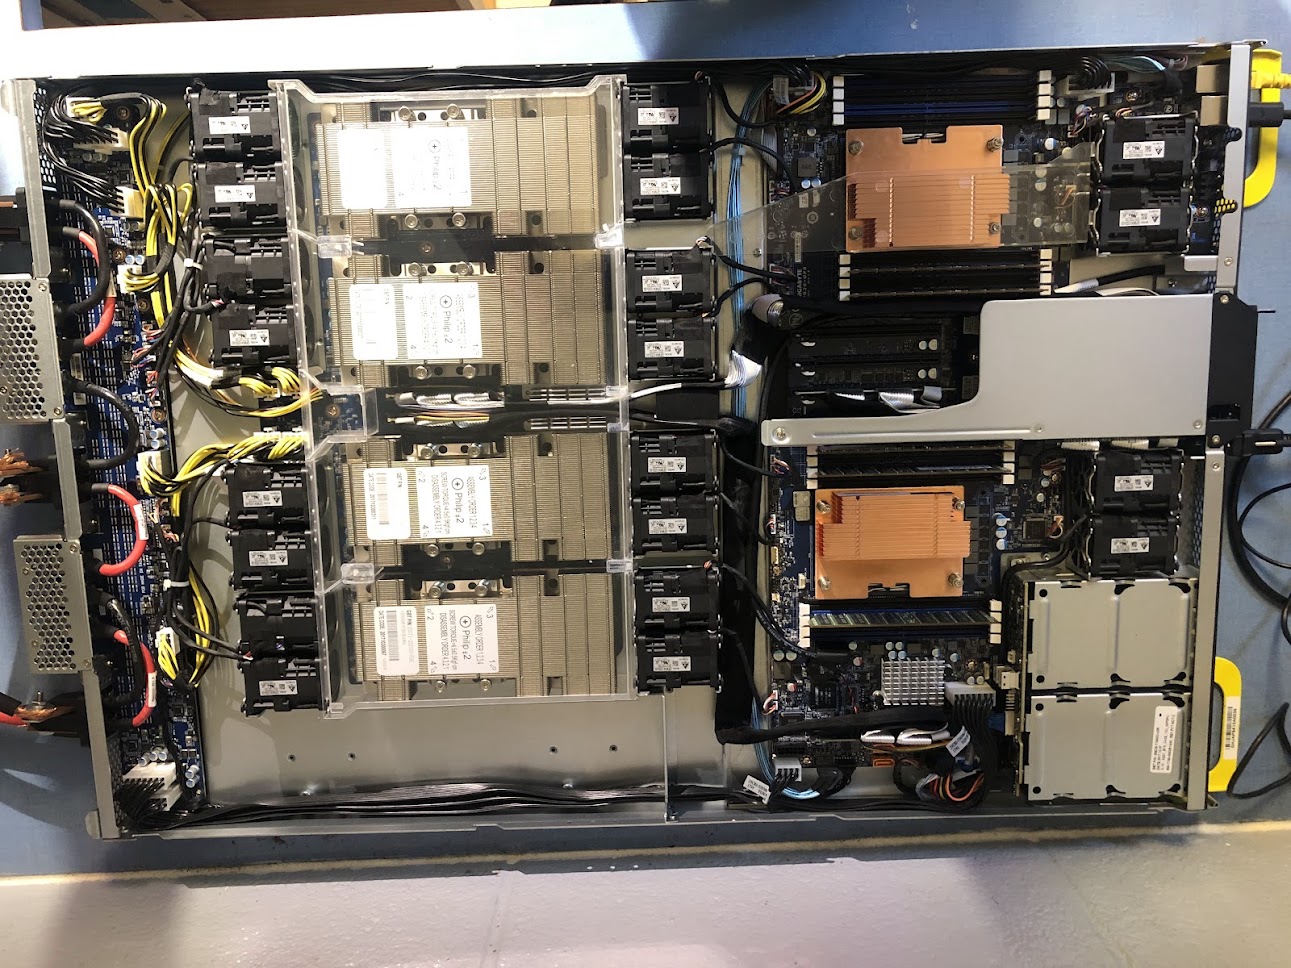
And here is the server with all the GPUs, memory, and heatsinks installed!
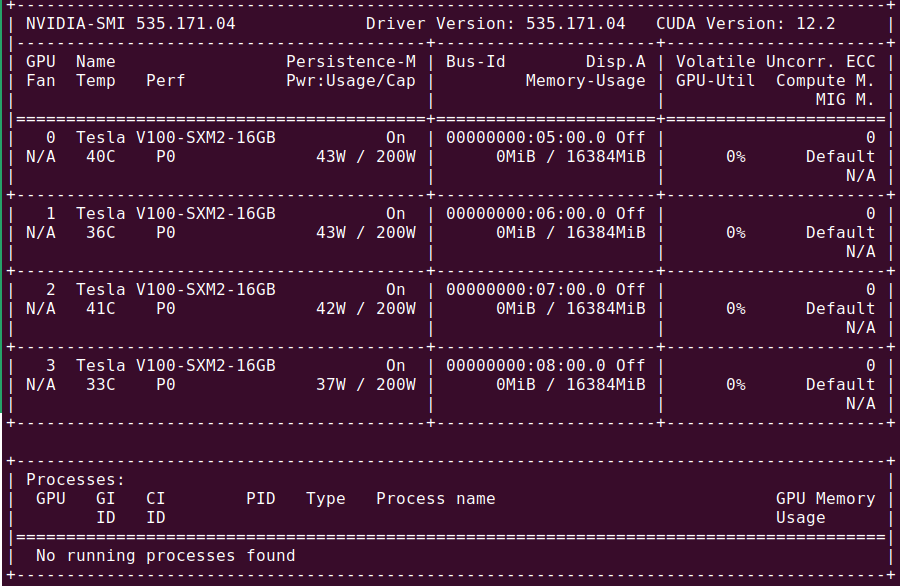
I had to re-install two of the GPUs a couple times in order to get them to be recognized by the system, and whether this was due to dusty SXM2 pins, incorrectly torqued screws, or just old hardware it is difficult to tell. Happily it is easy to see if a GPU is connected using the sudo lshw -C display command, and the nvidia toolkit finds the GPUs as well. I had installed fairly recent CUDA driver (535.172.04) and API (12.2) versions, and you can see that here. Note that the GPUs are by default in maximum performance mode (P0) even while idling: this is to be typical of SXM-socketed nvidia GPUs, and indeed the SXM2 V100 cannot be set to any other mode. Note too that watts per GPU at idle has roughly doubled from what it was when a single GPU was installed to ~40W: this is unsurprising, given that the NVLink connections between GPUs cannot completely power down when not in use (typically at least two of the eight link channels are active at all times). Could be worse: A100s typically idle at around 65W each, and H100s (95 GB version) at 100W each!
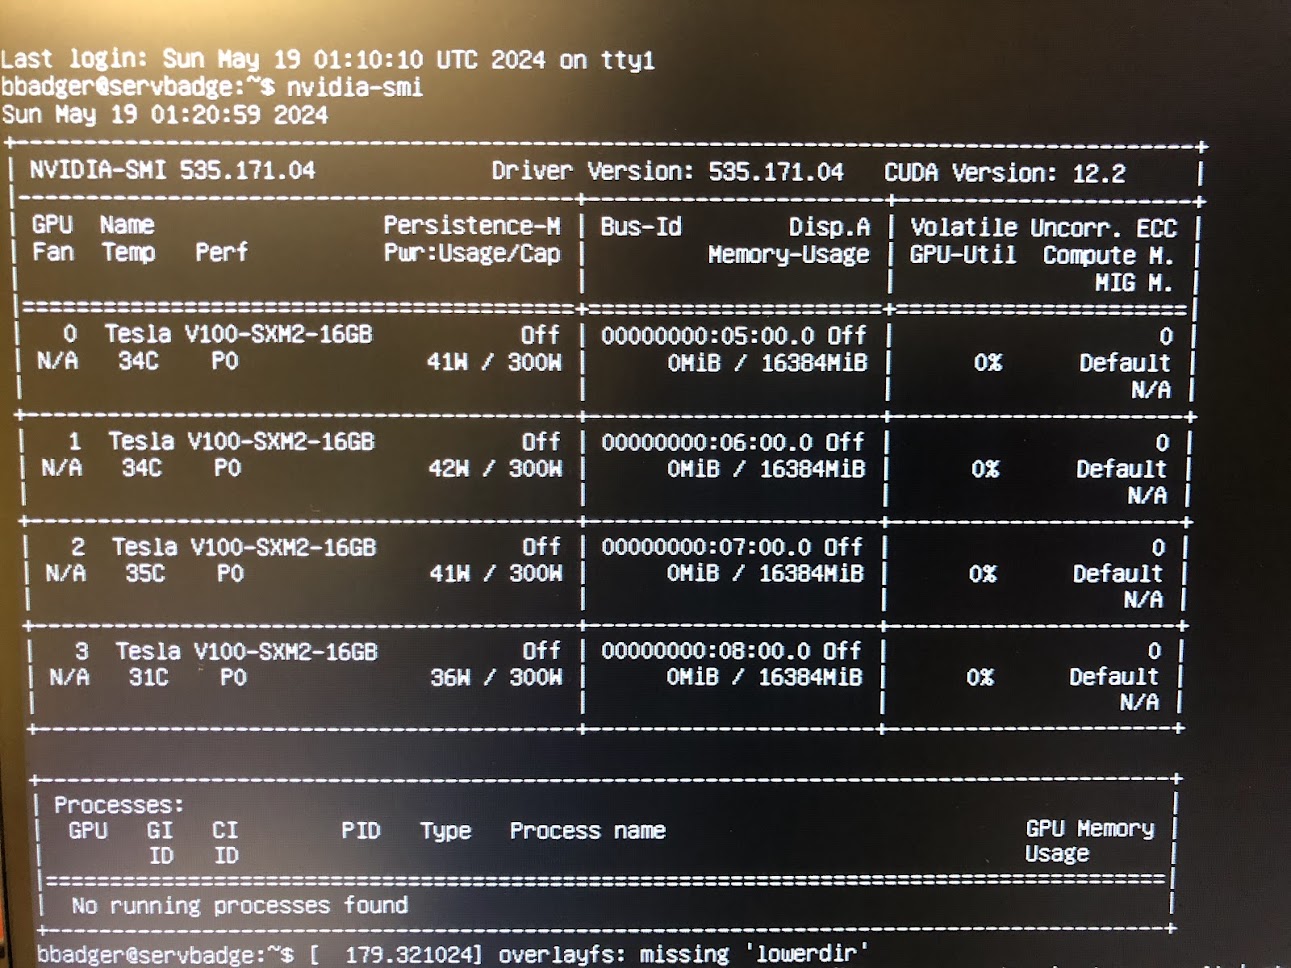
With the four V100s installed have an impressive 500 teraflops of matmult performance for ~600$ worth of GPUs. A little appreciated fact is that watt-for-watt the V100’s performance is similar to the A100, which has a TDP of 400W (30% more than the V100), while the A100 is typically perhaps 45% faster for real workloads. Both wattage estimates are averaged over time, as it is uncommon for the V100 to near 350W and the A100 to approach 475W at peak boost.
Stress Testing with Deep learning training
Now that the power supply had been sorted out (or so I thought) I went ahead and stress tested the server for workloads typical of what I intended this machine to experience in order to make sure that the GPUs and other hardware elements were performing optimally.
Launching my distributed_mixer_trainer.py module via torch.distributed.launch for DDP training via
$ python -m torch.distributed.launch \
  --nproc_per_node=4 \
  --nnodes=1 \
  distributed_mixer_trainer.py
I was in for a surprise: using up to three GPUs (--nproc_per_node=3) performed as expected, but adding the fourth caused the GPUs to drop off the bus, or in other words to crash so completely that they cannot be found via nvidia-smi -q. The error messages were extremely unhelpful, and essentially conveyed that there was an unknown failure with the GPUs themselves.
After some reflection I wondered whether this could be due to the power draw being too much for my power supply: even though the supply should be good for 2100W (175 Amps at the terminal), this server is actually designed to be supplied by 200 Amps per terminal and thus is being somewhat underpowered. But if the TDP of the server is 1500W, why would this matter? It turns out that V100s (like A100s and other high-performance datacenter GPUs) are capable of drawing much more current than their maximum rating for short periods of time during boos: I have seen a 16GB V100 SMX2 on this system (rated at 300W) draw over 350W. Even this should not be a problem for our server PSUs, but a rapid increase in load (for a PSU not designed for this) might be: in tenths of a second, it is not uncommon to see a V100 go from 150W to 350W. If you multiply this by four, you get nearly 1KW in rapid load increases, which might lead to undervolting. When I tested the power socket voltage during this ramp-up, it indeed did drop to nearly 11V.
A straightforward way to prevent this issue would be to simply limit the amount of current the GPUs may draw. This may be done via nvidia-smi -pl followed by an integer corresponding to the number of watts per GPU desired. After enforcing this power limit, we indeed see that the average power does decrease to approximate the limit but that performance is very lightly affected, such that going from 300W -> 200W results in a ~15% performance decline for the V100. This is even less that what was observed for consumer graphics cards, but I ended up having the same GPU bus drop problem as before under full load.
Close inspection with watch -n0.1 nvidia-smi revealed the cause: the average current was lower but the peak current was far above the specified 200 watts per GPU, and even exceeded 300 watts! Clearly the V100s viewed the power limit as more guidelines rather than actual rules, so I resorted to down-clocking the processor to avoid boost as follows:
bbadger@servbadge:~/experiments/generative-models/mixer_lm$ sudo nvidia-smi -pm 1
bbadger@servbadge:~/experiments/generative-models/mixer_lm$ sudo nvidia-smi -ac 877,1005
where the first command induces persistance and the second specifies the application clock speed in format <memory_clock,processor_clock. The exact processor and memory clocks that are allowed are somewhat arbitrary depending on the GPU, and you will have to use nvidia-smi -q -d SUPPORTED_CLOCKS to view the clock limits that are supported. Newer GPUs have an -lgc flag that can be used to specify a logic versus application clock, but this flag is not present for the V100.
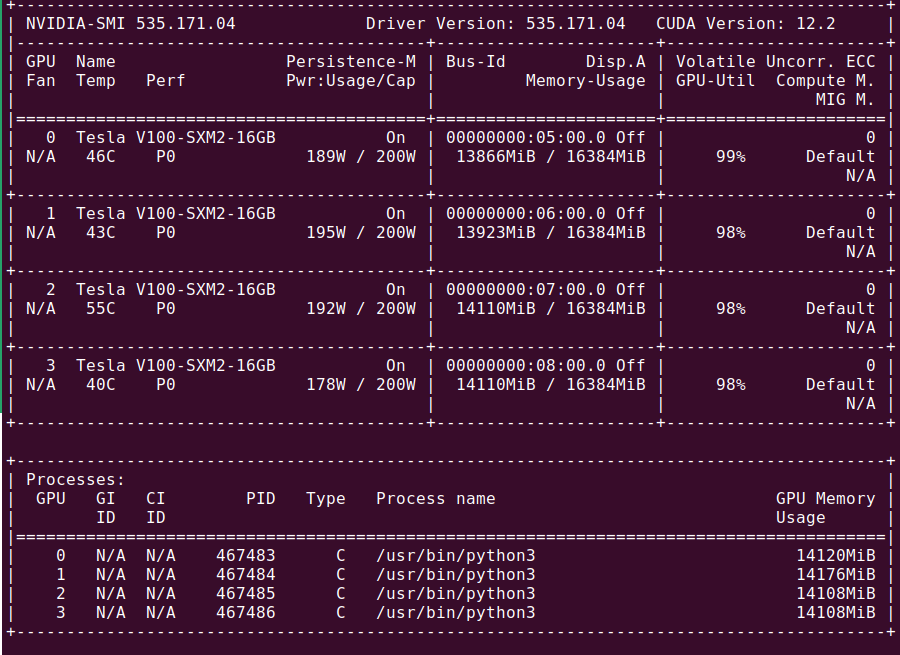
After applying the clock limit, we have GPUs that are now observing our intended power limit, and training proceeds successfully.
Note that the GPU in position 2 is running significantly hotter than the others: this is only under load, and was due to an incorrectly torqued heatsink. After tightening, the GPU is more in line with the others and no longer ramps up the fan speed (more on that later).
It is remarkable that removing the V100 boost clock speed (1530 MHz) and reducing the base from 1290 MHz to 1005 MHz (along with our earlier power limits) leads to such a small change in performance: enforcing this for a training run with only two GPUs during a test leads to a ~13% decline in training speed.
That said, once these tests were completed I connected the PSU current share pins (see the PSU section for more information) and after doing so and switching to the XT60 plug output on the breakout board, the GPUs were able to run at full power (up to ~350W each). I consider the ~600W total saved to be worth a 13% performance drop, and continue to run the GPUs as 200W each.
I experienced difficult-to-pin-down training process hangs and freezes which manifested as nv_queue processes taking nearly all a CPU’s compute followed by interrupt requests (irq/57-nvidia) that also hangs, leading to stalled GPU processes with high vRAM use. Close inspection reveals that these are associated with nccl communication problems, which means the GPUs are not communicating properly with each other or the CPU. I was able to solve this problem by simply tightening the screws that affix the GPUs to the SXM2 socket.
As a final note, python3 -m torch.distributed.launch is a legacy DDP launcher, and I prefer torchrun as it is easier and slightly more performant to work with for this server, e.g.
$ torchrun --nproc_per_node=4 model_run.py
Performance
Now we can test the performance. Happily it is very good! For deep learning, each V100 is generally between two and four times faster than my RTX 3060. The exact difference depends somewhat on the task at hand, and appears to mostly be the result of the difference in memory between these GPUs: the 3060 uses GDDR6 (fast clock, low bandwidth) and the V100 uses HBM2 (slow clock, large bandwidth). Thus for models with small weight matrices the 3060 is relatively better-suited, but for larger models the V100’s HBM2 becomes far superior. In my tests on a 2048-model dimensional language mixer, a mixed precision training run with the 3060 took 880 seconds, whereas a single V100 took 286. This ~3.1x speedup seems typical of medium-sized models for mixed precision training, and aligns with what is expected from theoretical values from Dettmer’s blog post.
We also get to enjoy the fruits of our SXM2 socket labor: because the inter-GPU bandwidth is a whopping 300GB/s, there is very little per-GPU performance decrease when parallelizing a workload using distributed data parallel for a medium-small model with ~300m parameters, with some current and clock limiting for power reduction: with one GPU a similar training run took 361 seconds, with two 180 seconds, with three 121 seconds, and with all 4 GPUs 92 seconds. This sort of thing is generally not possible NVLink: it is common to see speedups of between 3.5x and 3.6x for four GPUs that are connected by PCIE 16x lanes to the CPU. Here the very high GPU communication bandwidth allows us to hit a speedup of 3.92x for four GPUs! The same speedups are observed even when the GPU application clock is not limited to 1005 MHz, although in each case there is an approximately ~14% reduction in time at the cost of around 600 watts. This means that with all four GPUs at full power, training is completed in 79 seconds. This is a speedup of 11.1x compared to the same training run on the 3060!

To substantiate the claims made earlier that the CPU core number is quite overkill for training deep learning models, observe the single-Xeon 2680 (with 28 threads) CPU utilization for a CPU-intensive task such as fast tokenization,

or a similarly intensive task of performing forward- and back-propegation on a medium-sized model.

In both cases the majority of thread are heavily utilized. Now for the thread utilization for four-V100 DDP training:

the cores utilized count is small because the DDP defaults to a single thread per GPU, with a few threads saved for data loading. Increasing the number of threads per GPU in my experience does not result in better performance and indeed often leads to detrimental effects. Because of this, we can estimate that a 28-thread CPU could support nearly two dozen GPUs if the PCIE lane count were high enough. The 4x V100 SXM2 board requires two 16x PCIE lanes, so 20x V100s would require 160 PCIE lanes. That said, having a large number of cores can come in very handy for CPU-bound tasks such as tokenization or more complicated linear algebraic tasks, and a better CPU certainly makes cpu tokenization quicker. Because of this I run the server with both CPUs installed rather than just one.
HPC performance
This server is not only used for deep learning, however, and is also applied to more traditional high-performance computing tasks such as integrating partial differential equations. In particular, it is used for three body problem research which entails integrating differential equations for Newtonian mechanics over tens of thousands of steps, for millions of starting conditions. This is a very different challenge than deep learning training, and I assumed that the V100 would provide some benefit over the 3060 but not perhaps as much as for deep learning.
This is because deep learning training involves loading data from memory to registers, performing matrix multiplication and addition, and then sending the result to memory. There is some difference between a forward pass were only output vectors are computed (which is more likely to be limited by the rate of memory transfer to registers) and a gradient back-propegation where Jacobians must be found (more often limited by compute speed in addition to memory transfer rates), but the fundamental steps are fairly similar. This is why nvidia’s introduction of the tensor core that can multiply 4x4 matrices in one step is so useful for deep learning, and indeed the introduction of this led to a much larger increase in relative performance in the V100 versus its predecessor (P100) than any subsequent generation yet.
But differential equation integration for many starting values is very different: here there is little or no requirement that each value stored in an array in memory must be added or multiplied to other values, or that different parts of memory must be re-loaded to registers. We can hope to approach the expected limit of floating point operations due to this more limited memory movement, and a quick search finds that a 3060 has a floating-point TFLOP expected value of 12.74, where as the V100 improves this slightly to 15.7 but has a lower processor and memory clock speed that makes small memory transfers relatively less efficient. The V100 is far better at double-precision computation however, boasting 7.8 versus 0.2 TFLOPs for the 3060.
It will not be entirely unexpected, therefore, that the V100 is far superior for 64-bit numerical integration of the three body problem: for 1 million starting configurations (each simulations for 50 thousand steps of Newton’s method) a 3060 completes the integration in 464 seconds whereas a single V100 requires only 59 seconds (a 7.9x speedup), and a distributed version of the integration algorithm completes in a mere 15.2 seconds. This is an effective speedup of 31x for the server, not bad!
It comes as a complete surpise, however, that the V100 experiences an identical speedup for 32-bit (float) numerical integration, with the four GPUs requiring only 7.04 seconds to complete the 50k steps that the 3060 took 212 seconds for (using an CUDA kernal that is already highly optimized). This is completely unexpected if we take the FP32 TFLOP estimates for these cards at face value, where one would predict only a 1.2x speedup. Why then is the V100’s integration so fast?
The answer is difficult to know exactly without knowledge of how each device handles each computation, but there are two probable explanations. One is that memory in each type of cache that exists in these two devices. The 3060 has 28 streaming multiplexes each with 128KB L1 cache for a total of 3.584MB, and a 3MB L2 cache. The V100 on the other hand has 80 streaming multiplexes each with 128KB for a total of ~10MB L1 cache with a 6MB L2 cache, and therefore can load much more information from global memory at a given time.
The other possibility is that there were unannounced performance degradations in the floating point precision computation for the 3060, or equivalently that the official value is over-estimated. This is likely because the expected speed increase for a 3060 going from 64-bit double to 32-bit single precision is a factor of 12.74/0.2 = 64x, but we see only anapproximately 2x performance increase for that device when this change is made. I expect both memory capacity and TFLOP estimation to be the reason for the V100 performance increase.
Noise
This was one of the things I though hardest about before going the T180/T181 route over a bunch of used 3090s in a PC. The world’s best server is useless in a home setting if it has the acoustic properties of a turbojet engine, unless one were to make special accommodations such as walling off the server in concrete. This sort of thing did not appeal to me, and while the server was going to be operating in a basement room and could be noisier than the average PC it could not be overly loud.
The reputation of 1U servers (the more common measurement that is most similar to the T180-G20’s 1OU form factor) is that they are simply too loud for home use and that they indeed sound like jet engines. This much was even claimed by George Hotz while talking about the motivations for Tinygrad’s Tinybox, but I can confirm that it is a bit of a misunderstanding. The potential for a high-performance compute 1OU server such as the T180 for making noise is indeed very high: when first booting up, for example, all 40 fans ramp up to their maximum 25000 RPM and the server sounds much like a jet engine during takeoff, such that one needs hearing protection to work with it in a small room (testing or setting up ssh, for example). The fans to modulate after a couple minutes, and the noise becomes much more managable and is what one would expect for a blade server: equivalent to a somewhat noisy Desktop PC, just with a timbre more akin to a turbine.
What matters after those first thirty or so seconds is that even heavy loads on all four V100s does not lead to the fans reaching anywhere near their maximum RPM provided the ambient temperature is near room temp (72° F). This means that once the BMC is initialized, the fans should not be expected to reach the speed they started at again. All without adjusting the server’s preset fan curves, and with the GPUs never reaching internal temperatures higher than 60 degrees.
I would not want to run an unmodified 1OU HPC server like the T180-G20 in a living room, but in a basement or attic or garage it is virtually unnoticeable from living space. If you have ever heard a fan-cooled ebay grow light before, it sounds pretty much identically to that during normal operation just with minor fluctuations as GPUs ramp up and down.
That said, modifying a 1OU server like the T180-G20 for quiet operation would not be very hard: the only reason this server is noisy is because the fans spin at such high RPM (which is necessary for sufficient air movement as they are very small). Swapping for a much larger but lower RPM fan would prevent most of the running noise. There are only two air intakes (one on the front with the IO ports, one on the top for accessory cooling) so simply hooking up a large blower motor (think 1/5 hp floor fan) to the front and sealing the top air intake would provide more than enough airflow to allow one to remove the small fans entirely.
Conclusion
To conclude, you can build a 4x SXM2 V100 server that is very good at all sorts of things for well under two grand if you are willing to be resourceful and hack together a power supply. I reckon that this system is overkill for small-batch inference, but for large-context or large-batch LLM inference where compute is limiting, or else training models, or especially anything dealing with high-precision floating point operations it seems to be one of the best deals to be had.
That said, this server performs very well for smaller inference tasks: an 8-bit quantized Llama 3 (8b) runs at ~71 tokens per second while only taking around 75 watts per GPU for unbatched inputs, and a 5.5-bit quantized Llama 3 70b (for a model size of 50 GB) runs at ~14 tokens per second with around 125 watts per GPU. Due to the high CUDA and tensor core count, increasing the context to 2k tokens results in a barely noticeable drop in generation time (~13 tokens per second for 70b llama). To be frank, these are not particularly good tests of this server as the GPUs experience very low Tensor and CUDA core utilization even for long-context inputs, typically less than 30% of all CUDA cores are active during such inference runs.
If you have more cash you could build three of these with 32GB V100s and hook up some mellanox switches (which connect to the free PCIE lanes and ports in the middle of the T180-G20 for up to 128 GB/s internode communication), which would allow for fairly fast training of models up to around 400 billion parameters via bitwise optimized FSDP with low rank adapters.
One Year Update
After using this server for a little under a year, I can offer a bit more commentary on its capabilities and suitabilities for various workloads.
Training Small-ish Models: Extremely effective. For models where the parameters and gradients and optimizers fit inside GPU memory (one copy per GPU that is), training is mostly limited by tensor core occupancy and throughput and also memory bandwidth to a larger extent than GPU memory size. This is the case for models less than around 1 billion parameters for the 16GB V100s, and for a typical ~100 million parameter mixer model you can expect a throughput of around 400k tokens per second (~35 billion tokens per day). It is important for the model’s matrix multiplications are large enough to make efficient use of the HBM-2 memory (generally $d_m \geq 512$ with efficient architectures will suffice), or performance will be somewhat worse.
Training Large Models: Generally capable, sometimes ideal, provided the model is not too large. The server is effective for training of training LLMs via full parameter or efficient (qLoRA) FSDP or ZeRO stage 2/3. For specifics, you can expect to see a training throughput of around 2800 tokens per second for a qLoRA (r=128) training of an 8b Llama 3.1, or around 500 tokens per second for a full parameter finetune of the same model using context windows of 2048. If you expect to perform this kind of workload frequently, I would probably recommend investing in the 32 GB V100s as you will get super-linear speedups from the 16GB version due to fewer parameters and optimizer state transfers between GPUs and CPU.
Even if you stick with the relatively inexpensive 16GB V100s, however, you can train models of fairly large size with extremely large context windows via FSDP thanks to a number of optimizations added recently such as various forms of context parallelism. It is truly remarkable that you can train all parameters of Llama 3.1 (8b) with a context window of 32,768 tokens and achieve a throughput of 14,000 t/s on this server, and hit 100,000 t/s for the same model with qLoRA, or even train a 70b parameter model using qLoRA on an 8,192 token context window at 1,500 t/s.
It is interesting to note that the SXM-2 version of the V100 is substantially faster for FSDP than the PCI-E version, even though the latter is currently much more expensive. As an example, I benchmarked an SXM2 versus PCI-E 4x V100 (16GB) servers against each other for qLoRA FSDP on a Llama 3.1 (8b) training run and the PCI-E throughput reached 1600 t/s compared to the 2800 t/s of the SXM2 version. For FSDP + qLoRA on a 70b Llama 3.1 the throughput comes out to around 400 t/s for SXM2 compared to ~300t/s for the PCIE version. This increased performance is primarily due to the substantial increase in inter-GPU bandwidth (300 GB/s compared to 16 GB/s) and secondarily due to the larger Tensor core FLOPs (125 vs. 112 fp16 tensor core FLOPs) of the SXM2 version.
If you are interested in performing lots of qLoRA training runs on large models you may want to look into an Ampere or newer GPU if you can afford it. The reason for this is that Volta architecture GPUs don’t support brainfloat16 (aka bf16) kernels, meaning that you can emulate bf16 in fp32 but then you can’t use the tensor cores (which require 16-bit inputs) such that bf16 forward and backward passes are 3-5 times slower than they would be in an Ampere or newer architecture. Right now FSDP+qLoRA requires the 4-bit storage dtype to be all one datatype, which is a potential problem as automated mixed precision training usually maintains certain layers (layer norms, RoPE values etc.) in 32-bit precision if the rest are in 16-bit precision for training stability. What this means is that training all model parameters via FSDP is relatively unaffected by a lack of bf16 support, but reasonably fast qLoRA+FSDP requires all model weights to be fp16 for Turing and older architectures which potentially may lead to numerical instabilities. I have personally not observed instabilities during FSDP+qLoRA training on various V100 clusters (AdamW optimizer with a standard <=1e-4 learning rate, LoRA on all linear transformations etc.) but the possibility remains.
If you are interested in training large foundational models, this cluster and in particular the 4x V100 configuration is still an extremely good deal but if you have the resources I would probably advise going with a GPU that has 8-bit tensor core capabilities, such as the H100 for both FP8 and INT8 tensor core capability or else the A100 if you can’t swing the H100. The reason for this is that training foundational models is far more efficient using 8-bit mixed precision (most params in 8 bits and some in 16 or 32 bits with some special normalizations) than with 16-bit mixed precision for hardware that contains tensor cores that support 8 bit computations, and in theory is twice as efficient. Even today (early 2025) most large language and vision-langauge models are trained via 16-bit mixed precision, but it is clear that 8-bit mixed precision is feasible and more efficient such that it won’t be long before this is as common as 16-bit mixed precision today. You can emulate 8-bit precision using the V100’s 16-bit tensor cores but this is extremely inadvisable as you don’t get any real performance gain and quite a bit of loss in practice.
Quick note: I have found that FSDP is usually significantly more memory-efficient than ZeRO stage 3 for 8b parameter models, apparently due to the use of standard block sizes and flat parameter sharing rather than ZeRO’s more involved and ad-hoc (but more flexible) parameter and gradient sharing. It seems to be a little bit more performant as well, at least in the Pytorch framework, with my very rough estimate being around a 10% speedup.
That said, an SXM5 H100 costs around 10k USD meaning that you could buy, populate with GPUs and CPUs and RAM, and fabric interconnect 5 T180-G20s for the price of a single H100 GPU. With this configuration (4xV100 per T180, with 16GB versions) you would have 320 GB VRAM, a total of 180 TB/s VRAM bandwidth, and 2.5 PFLOPs of 16-bit precision arithmetic. These statistics compare favorably with the H100 (80GB, 3.4 TB/s VRAM bandwidth, and 1.98 PFLOPs 16-bit arithmetic of the H100. I would probably not recommend actually going the T180 route as the power consumption would be far higher per FLOP, and really the 32GB V100 would be necessary for reasonable performance for very large model training. But it is useful to put into context just how good a deal 16GB SMX2 V100s currently are. It is likely that the price for the 32 GB version of this GPU will fall precipitously in the next year or so, in which case it will likely become the best enterprise GPU deal to be had.
Inferencing Large Models: Mostly overkill, effective, or not ideal, depending on the model size and inference batch size. The ability to run 70 billion parameter models for non-batched outputs with mild quantization reasonably quickly (16 t/s) is nice, but for this task the GPUs experience relatively low utilization. Where this server really shines is when using a parallelizable inference engine like vllm such that inference is no longer limited by sequential data transfer to and from global GPU memory but instead by a combination of tensor core occupancy and memory throughput. As an example of the huge performance gains to be had with this type of inference, with moderate context (1k-7k tokens) and medium-sized batch (b=128) inference of a Qwen 2.5 7b model has throughputs of ~10k tokens per second on input processing and ~1k tokens per second output.
Processed prompts: 99%|█████▍| 127/128 [00:07<00:00, 52.95it/s, est. speed input: 9773.62 toks/s, output: 917.14 toks/s]
If you are not planning to perform batched inference, you are probably better off with 3090s or L40s if price is not an object. If inference throughput is of utmost importance and your model framework supports 8-bit or 4-bit integer computation (vLLM currently supports fp8 and int8 for Hopper GPUs), you are probably better off with an Ampere (which supports 8-bit int) or a Hopper (4-bit int and 8-bit float) architecture GPU. Additionally, these newer GPUs will give you the ability to use optimizations (like chunked prefill available as an experimental feature in vLLM) that speed up input and output processing especially for large context windows.
Anything requiring high numerical precision: This machine is far and away the most cost-effective approach to 64-bit computation. Consumer GPUs don’t really offer proper support for this as it is relatively rare outside scientific computing, and the V100 is by far the best 64-bit FLOP per dollar GPU on the market (~8 TFLOPS for 150 dollars, compared to ~10 TFLOPS for 3k dollars for an A100 for example). There isn’t much more to be said here other than as long as your high-precision simulation is sufficiently GPU-limited, this server will offer you remarkable speedups relative to consumer or industrial hardware of equivalent price. In my case what took weeks for an RTX 3060 to compute requires a few hours for the four V100s.